Tuesday, March 01, 2011

CiM 499: Rainforest


Apols for the delay in getting these to you - I was away all last week and I decided to leave the laptop at home. I had intended to get these online before I left - but HA! - that didn't happen!

New colours from Creation is Messy - and what awesome new colours they are!!!!!

First up - Rainforest!

Rainforest is a translucent forest green - a totally yummy colour!


From right to left, we have self coloured, over white, and over clear.

The self-coloured bead (solid colour) has the appearance of an opaque, and appears to have gone opaque on the sides, possibly from heating and cooling, or a different cooling speed. It is quite a dense colour, and certainly reads as an opaque like this.

But - as a thin layer over white, it has a luminosity that an opaque would not have.
And over clear, you can see that it is actually a translucent. This is a fairly large transparent core, with just a thin layer of Rainforest.
These are Rainforest dots on ivory. It looks a little greener, and has reacted with the ivory.
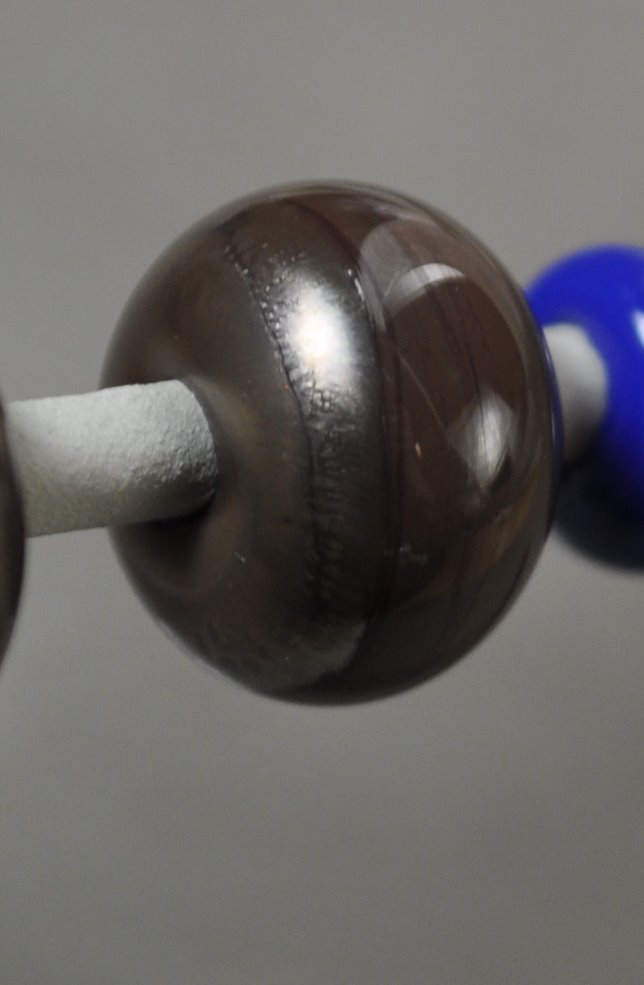
And this is another self-coloured bead, reduced. It shows as being quite a bit darker overall - approaching black, and has developed some red splotches from the copper reducing.
The red spotches are hard to see - but the arrow is pointing right at one in this shot.
I am totally excited about this colour!

Tuesday, February 15, 2011

Sunday, February 13, 2011

Effetre 420 Coral - Sunburst

I stand by my position - no two batches of Coral ever come out the same. This is variation "Sunburst" - and it is as happy and cheerful a shade of orange as you could wish for. It is a pretty shade of orange, and not really coraly at all.

Below, from the left, two self-coloured beads, one with clear dots (making the colour underneath a little lighter - common with orange glass, and the rightmost bead has dots of CiM Celadon. Notice a little reaction at the edges of the dots. Nice.

The bead on the left here is dotted with Triton, and reduced, and shows much darker - due to the effects of the silver in the Triton. Also common for orange and red glasses.


Looks to be a happy orange colour that behaves in predictable ways. And - I think I may have forgotten what colour 420 Coral was originally anyway. I guess it goes back to how far back "original" is for you!

Friday, February 11, 2011

Vetro 945 New White

Yeesh - a shortage of white.

Good thing it's white, and not some useful colour. ;-)


This has an off-white look in the rod - that isn't readily apparent in this photo, but makes you think of Effetre 208 Anise or Winter White.

Below - the two beads on the right are Vetro New White, and the one on the left is white is half and half - the other half is a white which I had laying around, unlabeled - so I'm not dead certain, but I believe it is Effetre 204 White.


It definitely reads as white.

This bead (below) is the half and half. The right side is Vetro New White, the left side is Eff 204 White. (Probably - anyway - a regular white.) You can, barely, see a line between the two and a slight colour different. Barely.

Here, you can see the line more readily - at the edge of my fingernail.
It is not quite as bright a white as you might be used to - but I don't think it is even as extreme as saying it is the difference between regular photocopy paper and the good stuff. You might look at it and say - "Well - it's not a pure white - not as white as it could be, but still a white." The cast, such as it is, it the warm colours, not blues.

One of the very interesting things about this white, however, is how much longer it takes to go back to being opaque as it cools. It is significantly longer - so much so that with the half and half bead, I had time to peer inside the still transparent New White side, and look at the inside of the now white-on-the-outside regular-white half. That was interesting.

These are New White with trails and dots of Double Helix Triton, reduced. The white has readily and dramatically fumed from the silver in the Triton.

And this is just a big ol' end-of-day bead - the base is scraps of clear, New White goobered all over it, trails of Triton and Clio. Scumble it all around with a rake and give it lots of heat. Shape that baby, fire-polish it well, kiss it with reduction, kiln it. Very Organic.

Wednesday, February 09, 2011

Vetro 824: Purple Plum


Vetro Purple Plum - one of the family of opaque purple glasses that go brownish when worked, much like Effetre 274 New Dark Violet and CiM Grape Ape.

In fact - brown-ish denies that this glass pretty much reads as brown.


This glass, after being worked, looks like a nice organic brown, like a cocoa.

One thing I did notice, see on the right most bead, next to the mandrel?

Here's a closer view - almost like a devitrification - a distinctly metallic area. This is intriquing, worthy of further investigation.

This bead has dots of CiM Ginger (not ivory).
And this has dots of clear, which has retained the purple look. In between, the glass has darkened.

Interesting potential for some patterns with clear dots or stringer, and an interesting colour for an organic, brown background, or small animals - horses perhaps?

Definitely would like to experiment some more and see if that metallic sheen was a fluke or can be reproduced reliably.

Monday, February 07, 2011

Effetre 275M - Dark Silver Plum M

Dark Silver Plum - version M. Machine-made. Oh dear.

My beloved Dark Silver Plum - what have they done to ye?

Apparently - I have not done a review of dark silver plum in the past - so you may not be aware of this truly delicious glass - one of my favourites. Contrary to it's name, there is not much plum to this glass - if you are going to think "purple." The rods can vary from a dark steely colour to a shimmery dark cocoa - but what it does is goes metallic, a dark shiny silver, and in some places, develops a beautiful high gloss metallic, and in others a matte shimmery silver. It's gorgeous. Allow me to show you.

This goddess bead, ...


This dragon bead, (notice the contrast between the highly glossy face and the matte bead he is clinging too.)


And this horse sculpture, all made with Dark Silver Plum.

CiM's Gunmetal is very similar, and I'll happily use it too. What I principly like is the matte effect, which is sort of like a devitrification (like EDP) - but I'm not sure if that is exactly what is happening.

Effetre 275 Dark Silver Plum has been one of the hand-made glasses - which makes it more expensive. So this new batch is - M - for machine made. And apparently - something has been lost in translation, as I can NOT get it to make the lovely matte effect.

Here are the two rods, side by side. Version M is the skinny one.


It stayed shiny. Now - it is a nice, high gloss metallically shine. And when they were hot - they definitely looked like they were going to be purpley - with reddish streaks.


This one was reduced. Looks pretty much the same.

So - I thought I'd compare. The two beads on the right are the original, hand-made (version H) Dark Silver Plum. The far left is the version M, and the ivory beads has version M dots. Here - the original version H didn't develop it's usual matte sheen either.

So I stepped down to the smaller torch.


These were done on the Mega, (instead of the Midrange) - notice the two on the left went matte? These are all version H.

So these were also done on the Mega, with version M. None of them developed a matte, metallic sheen.


So - I could not get the machine-made version to develop a matte sheen. Now, if that particular characteristic bothers you - you will be happy. It certainly develops into a nice shiny gunmetal colour - with perhaps a bit of colour showing. But given that I love that matte look - this one is not a substitute for the version H.

Saturday, February 05, 2011

Favored Tools: Duckbill Tweezers

I don't know what these tweezers are called - I've been calling them "duckbill tweezers" because - that's what Kathy Johnson called them in the class I took with her. I think I bought the last remaining pair on the planet - as I haven't seen any since.

It disturbs me that I have only one pair and no source - if something happens to them ... .

Anyway - the reason they are awesome is:

  • tweezers - they do all the tweezery things that tweezers do. (Am I the only person that finds the word "tweezer" inherently funny?)
  • indenting - the back of them is great for making a triangular divot to oh, say, place an eyeball in.
  • pulling & shaping - like pulling up and shaping ears.
  • squeezing - that end lets you squeeze a nice delicate line to straighten stringer.


The red patch at the end of them, by the way - is a mark made with nail polish. I put marks on all my tools so that at the end of a class - I can say - all the tools with red marks come back to me. It's equally useful whether I'm teaching the class, taking the class, or just demo'ing.


If anyone knows what they are "really" called, what they are supposed to be used for, or where they come from, please do leave a comment. I've described them to many people - who then promptly point me to bent-nose tweezers. That close-to-90-degree bend is important - and the shallow bend of the regular bent-nose tweezers just doesn't cut it.

Friday, February 04, 2011

Why does gold make glass pink?

I've had students ask me this, and I've found the answer. I just discovered an awesome bit on glass colour being created at the molecular level in this special from Nova: Making Stuff - Smaller.

Here is a link to the show - although I can NOT guarantee that it will work, because, I just get a message that it "will not play in my region due to licensing." Note to producers of show - on the internet - we are all citizens of the world.

Anyway - it is totally worth PVRing and watching. The segment on glass is about 2/3 of the way into the show, near as I can remember - and they get to talking about glass because they are discussing nanotechnology. The scientist being interviewed calls glass colouring from the 17th century (I may have the century wrong - I can't go back and verify it - because apparently I'm not in a region of the world allowed to see this. Annoyed much?) - anyway - he refers to colouring glass as "the first nano-technology." After two very nice pieces of film on staining glass and making glass (in the context of repairing and restoring stained glass windows for Canterbury Cathedral) - he goes on to explain that when the gold is in very small particles, instead of reflecting most of the light and looking shiny (like gold) - it absorbs a lot more blue and appears red. Furthermore - the shape of the molecules makes a difference too. The same applies with silver - and accounts for the yellow effect that we get from working silver near the clear glass and getting the yellow "fume" effect.

I hope you can manage to view it - it is always so cool to see glass being discussed intelligently on a science show.

Tuesday, February 01, 2011

CiM Grape Ape vs Evil Queen Revisited

Recently - I ran out of CiM Evil Queen for an order. Could I substitute CiM Grape Ape? I know the colours aren't the same exactly, but really - this is a set of bead with lots of other colours and I have some leeway. Let's just do some testing. Better to test a mandrel of beads than do an hour and decide I have to toss them all.

So, all of these have a base of Evil Queen. I was working from the right, and so I have dots of Grape Ape on the first two, and stripes on the third. Well - isn't that interesting -I'm getting quite a bit of separation between the two.

Do you suppose it will separate with itself? So - the fourth bead, on the bottom, at the left, is Evil Queen dots on an Evil Queen base. And, in defiance of logic, you can still see the dots.

Here's a closer view, although the reflections from the light aren't helping much.
Here's a close up of the Grape Ape dots on Evil Queen. Notice the discolouration of the Grape Ape - the shifting to a warm silvery brown. Hmmm.

Here the base is Grape Ape, and the bead on the right has nice, purple Evil Queen dots. The bead on the left is Grape Ape dots on a Grape Ape base. Whoa - they show up. I wonder if other colours do this?
On the right - Effetre Periwinkle (Good old reliable periwinkle). Check it out - the subtle dot on dot pattern of Periwinkle dots on a Periwinkle base. This isn't a batch difference - it's the same rod of glass.

The white bead, much to my relief, does not show dots. Although, I could make them out while it was hot ... .


Yet another way to add a subtle texture and interest to a bead, and perhaps a way to control and manipulate the streakiness of some glasses. (Think ivory.)

Sunday, January 30, 2011

Effetre 411 Apple Blush


Well - this is one of the most interesting new glasses to come across my bench in a long time. This is Effetre Apple Blush, and if the name "Apple Blush" makes you think of just ripening apples, as they turn from green to red - well - bingo - cuz that's exactly what colour this glass is. Green - with blushes of a warm orangey colour.

You can see here - the ends of the rod show a warm hint of colour.

The warm colour blushes seem more pronounced in places that have received more re-heating. Not necessarily where they have cooled slowly, but where the have cooled and been reheated.

It is quite visible under these large clear dots - showing it is not a reduction effect. If it was - it would not be under the clear, or if I worked the entire bead in a reduction flame, it would have been out side the clear as prominently.


Here is a self-coloured spacer - mostly a yellowy green ...
But, as I rotate it, on spot of colour blush on one side.

This one is with ivory dots. No reaction to the ivory, but definitely more colour.

As the glass heats - it goes a deeper version of the blush colour - so that the hot glass is a dark orange. It was unclear to me if it was going to retain that colour - which I could see developing on the rods - so I was nice to see that it stayed.

It is extremely easy to read the heat in this glass - I would recommend it for sculptural work.

Tuesday, January 18, 2011

Prince Rupert Drops

This is soooo cool. If you are going to do this, make sure that you don't injure yourself with flying shards of glass, and leave dangerous glass dust where it can be breathed in some time in the next couple of centuries.

This first video is from CMOG (Corning Museum of Glass) and really shows how they are made and how strong the bulb end is.


This video is also from CMOG - but really illustrates just how amazingly it blows up. Breaking the tail results in a shock wave of cracks that propagate towards the head of the drop at the astonishing spead of 5.5 Mach, or about 4,200 mph.


Isn't glass just the coolest stuff ever?

Sunday, January 16, 2011

Clio & Fuming


Remember I did Double Helix Clio over Cirrus a few days ago - and it fumed the Cirrus and made it look yellowish.

I tried Clio over the Lauscha Milky Way, and also got a yellowish tint, for the same reason.


And here's the two together, just for comparison. The Cirrus/Clio combo is the top mandrel, and the Milky Way/Clio combo is the bottom mandrel.


I think perhaps I should make sure we're all clear what "fumed" means.

Usually, fuming is achieved by taking either pure silver or pure gold metal, and holding it (usually by sticking it to a glass rod, like boro or quartz rod) - holding it in a reduction flame, below the bead or item that you wish to fume. So the metal is held in the flame closer to the torch, and the item to be fumed is held out at the end of the flame.

The metal heats and boils and evaporates, and is carried away by the rising flame - but some of it is deposited on the bead/item that is at the tip of the flame, as it rises and goes past it. This deposits a very thin layer of the metal on the bead/item. This creates either a shiny layer of the metal, very thin, or a reaction, i.e. when silver reacts with a glass to create a new colour.

Generally - that is what is meant by "fuming."

However, with the new category of silver saturated glasses, such as the Double Helix, TAG, and Precision 104 glasses - the silver content is so high that fundamentally, the same thing happens. The silver in the glass is evaporated off and affects the glass around it, creating the same kind of reactions.

One of the classic silver reactions is silver with clear and white to give a yellowish colour. (This is why it is hard to keep encased silver looking silver - it looks gold in places - because of the silver reacting with the glass.)

So that is why it makes sense that the base beads turn yellowish in the presence of a high silver content glass.

That's what we mean by fuming.

Friday, January 14, 2011

Lauscha Milky Way


It has taken me a long time to understand this glass - a long time to get the point of it.

This is Lauscha Milky Way - and in the unworked rod - it is a lovely, lovely misty blue - a translucent colour. And until the CiM moonstone colours came along - one of the few translucent glasses around.

But when you anneal it - it goes opaque. It looses it's translucency and turns to a very pale bluish white. Where's the pretty translucency? And so, disappointed, I put this glass aside.

But now that I am doing more sculptural stuff - now I get it! Because what you now have is a stiff colour - which is easier to keep control of, that is uber-easy to read the heat in while you are working it - that anneals to an opaque! The workability and stiffness of a transparent, but comes out as an opaque. Brilliant!

This off-mandrel, sculptural pony is pre-annealing. Note the more opaque band in the neck where I blew the heat control. He is, in fact, cracked there.


However, I went ahead and annealed him, and while he has stayed in one piece, I can feel the crack in his neck when I run my thumb over him. Working kind of large for my abilities just yet.

But, post annealing, now he is a milky white horse - slightly bluish - sort of a glacier color - but a solid colour. It is not without some areas of translucency, but just enough to be interesting. There are a couple of yellowed areas too - so I may have smoked the glass there.

I'm quite delighted to have this glass now!

This was pony number 2 - better heating, but the poor baby didn't get a mane! No cracks, but he's bald! Which tells me something about why the neck cracked in the other one. Blew it with the mane. If you don't get the parts done in the right order with this sculptural stuff - it just doesn't work.

Here he is, annealed. Still bald, poor baby. But not burned either - so that's an improvement too.