I tested a new colour from CiM - Sherwood - before I left - and I intended to blog it from the road - but the card reader on the laptop is not reading the card from my camera. So figures.
Anyhoo - new colour from CiM - nicely streaky - and I'll show you pics when I get back. (It's so new - it's not even on their site yet!)
Where the heck am I? I'm in Montreal - taking a class with Lucio Bubacco. Woohoo!
I repeat - Woohoo!
For the same reason - I can't post pics from the class. :-( So that too will have to wait till I get back.
If you aren't familiar with Lucio's work - you can check it out here!
Monday, May 31, 2010
Friday, May 28, 2010
Marble Molds - More on Shaping Tools and Making Marbles

In the resulting discussion on graphite shaping tools, some of you mentioned the Infinite Rim Marble Molds, designed by Drew Frits.
Ah - now these are gorgeous tools! I have had a pair of these for years - long before I started blogging, which is why it never occurred to me to mention them.
These are an absolute joy to use - if you have the cup shaped marble molds, I suggest you put them down and go order some of these. Oh sure, they are made to last forever, from high quality graphite and with a superior handle. Yes, they are beautifully balanced and elegant to use. But more than that, they actually work. (Go read Drew Frit's description of how they are different and how they work, in a nutshell - you are using the edge of the cup to shape, not the bowl, and because it is tapered - you have an infinite choice of edges to shape on.)
It is easy to shape a marble with them. Or whatever you have that you want a rounded edge on, tidy up an implosion pendant or some such - I use them all the time. I use the extra big one a lot too for transporting off-mandrel stuff to the kiln - I warm it in the flame, knock the item off the punty into it's spacious cup, flame polish the punty mark, carry it to the kiln and gently slide it out of the cup onto the floor of the kiln without the whole slippery tweezer trauma thing going on.
You can see the construction and the quality of the graphite. This is the big one, it is 1.5 inches at the widest part.
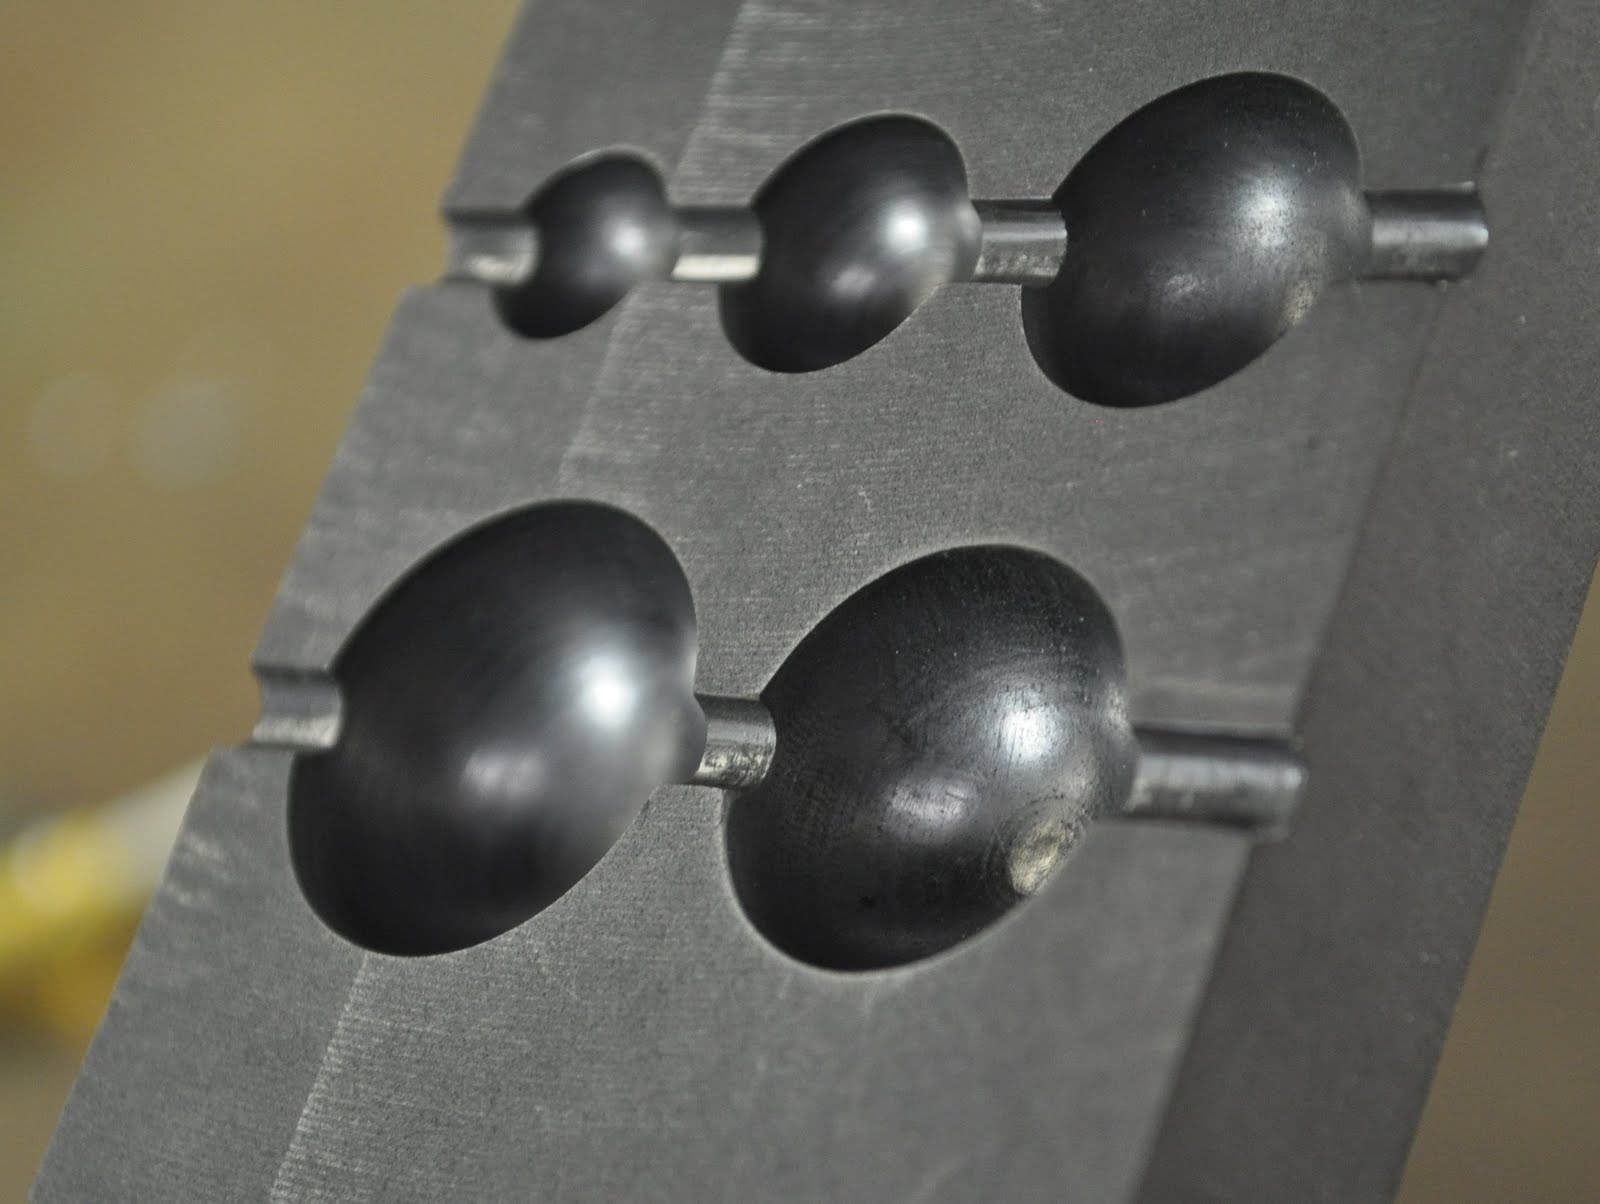
 This is the other one, with 4 cavities on one side, from 1/2 to one inch, and ...
 1.25 inches on the other. This angle shows you the shape of the cavity.
 And again, you can see it's not merely a half sphere carved out of the graphite.
 Course, if you want to know more about making Marbles - I also suggest and recommend Drew's book, "Torchworked Marbles, Vol. 1 Beginner to Intermediate Techniques." This is not an "eye-candy" book - in fact - the only colour picture is the cover.
What it is however, is packed with good, solid information, lots of steps and diagrams and detailed instructions. When it says "beginner to intermediate" - what it will do is take you from beginner to intermediate marble maker.

The book is primarily geared to soft glass, but covers boro as well. It contains a lot of very interesting information about colours and useful details about using them such as "bleeds - encase to control." or "won't cover black." He also has some very good tips on using punties so that you aren't fighting with thermal shock all the time.
It also has a section on mixing your own colours, including his own recipes, right down to the specifics of how much to use.
If you seriously want to get your head around marble making - buy a couple of his marble molds and his book. You'll be good to go.
Thursday, May 27, 2010
More thoughts on shaping tools

Well - last weeks post on the almost-ran graphite shaping tool brought out more comments than any single post so far, which was very gratifying. Wonder what I did right? ;-)
A number of you opined that said tool was a knock-off of the original CGBeads bead roller tools, and I would would certainly not argue against that.
 I have, in fact, tried the CGbeadroller. I just haven't presented it here as I didn't get beads I like from this tool, as it is quite possibly my least favorite bead shape on the planet. Which is certainly not the fault of the tool. Trying again was on my to-do list, which is currently long enough to have it's own postal code.
Anyway - if you are looking for a shaping tool - I suggest you have a look at her web site and check out the variety of cool tools, useful videos on how to use them, and her entertaining blog that features her cats frequently. ;-) CGbeads.com
And they have comfy handles that won't heat up and burn you on the first bead. ;-)
Wednesday, May 19, 2010
Round Bead Shaper
 I want to love this tool. Sniff.
It's like meeting an attractive, charming person - striking up a conversation, and then realizing they are explaining to you in all seriousness about the aliens that have infiltrated the government expressly to harass them personally.
Maybe you can be friends - but not without a lot of adjustments.
First of all - note the handle. Nice, lightweight aluminum. Metal. M-e-t-a-l. What are some of the properties of metal? Oooo, how about - most of them conduct heat?
And boy - does this one conduct heat - more than any other tool I have ever used! This tool was too hot to hold the handle before I had finished shaping the first bead. I actually had to dunk the handle in the water pot in order to finish the first bead.
It is very securely glued into place - so no shifting or moving - or taking out and replacing.
I stopped and went and found some leather cord and wrapped the handle to make usable. This worked very well.

The graphite is lovely - beautifully polished, and it is nice to have the graduated sizes, all there and handy.
The groove for the mandrel is not a bad size - easily accommodating a 1/16 dipped and accommodating a 3/32 dipped mandrel with some care. A dipped 1/8 is too fat - you'll knock the bead release off.
 And round beads are fun. Tend not to be dimply at the ends, unless you work extra hard at it.
To shape these beads, I found that what worked easiest was the shape the ends first, with the bead a little smaller than the finished side.
Pull the bead first to the left side of the cavity and roll to shape . . .
 then push to the right side and roll and shape.
Then add more glass to the middle, and finish shaping.
I found the edges of the cavities a little "grabby" - but I'm not sure whether that was having the glass a little too hot or a little too much glass, or that the edges of the shapes are quite sharply defined. I'm of two minds as to whether I want to knock the sharpness off the edge of the depressions with sandpaper or not.
This isn't the first round bead shaper I've seen - and while the size and number of shapes is good, and the quality of the graphite is excellent - the whole handle thing is a swing and a miss. Maybe they spec'd stainless steel and the manufacturer messed up/cheaped out. Whatever - if you pick this up - you are going to have to modify the handle. If you have to modify it in order to use - it should be priced accordingly.
Saturday, May 15, 2010
Just Beat It! - Etymology Notes
I just LOVE knowing the history of a word and it's meaning - gives you real power over the word and how to use it.
So about a month ago (where the heck did that month go?) I posted about an experiment with using non-fine-metal foils. In that, I speculated on the origin of "schlag" - which refers to thin metal foil for gilding, and the use of "schlag" to refer to adding whipped cream to a dessert (much like a la mode for adding ice cream) - in that both are gussying up the original product.
However, the reality is somewhat more prosaic. I got a lovely email from a fellow beadmaker in Germany who also has a penchant for testing. She says, in part
"Schlagen" is a verb, it just means "to beat". If you beat cream you get whipped cream, if you beat metal you get leaf metal. So the word "Schlagmetall" is just the german word for leaf metal. Sorry, no whipped cream at all.So - not nearly as poetic, but still lots of fun. And if you also love word origins, I highly recommend A Way with Words podcast. Wordy bursts of etymological goodness!
Thursday, May 13, 2010
Useful tool: Sink Strainer

Two for a buck at the dollar store. Sink strainer insert. Catches beads before they go down the drain. When cleaning mandrels - collects the big chunks of dried bead release.
Stops mandrels from falling down the drain too. Yep - done that.
Very useful. Get some. ;-)
Wednesday, May 12, 2010
Beau Anderson - Teaching in Toronto - May 27 - 31

You may remember, a while back, I posted about an artist dropping by the studio briefy and making a soft glass sculpture.
Well, that was Beau Anderson, and he will be teaching at beadFX at the end of this month.
If you dream of having this kind of control, if you look at this and think, "how can you do that with soft glass?", if you struggle with sculptural work, if you are starting to wonder how to make your work look different from the crowd. If you want to learn something that is not just another way to put a dot on a bead, but something that takes you to a whole new level, and you can't find the time and money to get on a plane and fly to Italy - then - take these classes.
If you tried to get into the Lucio class in Montreal - and missed - sign up for this class - Beau has studied with Lucio. (I was one of the lucky ones that did get into that class - otherwise, I'd be taking this class myself.)
The class offered is called "Freedom through Flameworking," and is offered as a two-part class - although I would surely sign up for both parts if I were taking it. There isn't a hard and fast class outline, mores the pity - but I would still take that leap of faith and sign up. I try and take at least one major class a year, and, like I said, I signed up for the Lucio Bubacco class in Montreal, with zero class outline, I might add. Figures, everything good happens at once.
beadFX advertised that the sign-up deadline was last Friday, but they have extended it. I would seriously consider signing up for this in the next week.
You know ya wahnnnna. ;-)
Call them - tollfree 877-473-2323 or 416-701-1373 or email, info@beadfx.com
more about Beau here:
- Wet Canvas
- BeauxBeads - his own website
- There's a thread here on Lampwork etc, from students who have taken a class. Or just
- google him.
Tuesday, May 11, 2010
Tumbler Cleaning
I've been off with a surgery, so the blog has been quiet for a bit. So I'm back, with a long one.
After reading Lori Greenberg's excellent blog about "tumbler cleaning" - using a tumbler to clean beads - I thought I should try it. After all, I too, hate cleaning beads. Not that I can say I actually know anyone who enjoys cleaning beads!
In a nutshell, the idea to thread the beads on twisted wire, and tumble them with steel shot, which bounces the wire around and abrades the bead release out of the beads.
I encourage you to read her original posts, which are comprehensive and well written (see link above). I'll wait.
dum dum de dum. Oh, you're back? Good. Now that you have the general idea, let me share my experience with you of attempting to duplicate her results.
First of all - assemble the ingredients. I already have the tumbler - I picked one up at a garage sale years ago. I have used it very little since then. I needed to find tumbler shot, which was easy, and craft pipe cleaners, which was harder. I eventually found those at Walmart - also called Chenille if you have to ask the staff for them. They were dirt cheap for a lifetime supply. The stainless steel shot was not - but as it is new - I do not encounter the contamination problems that Lori mentions.
 Step 1: Prepping the wire cleaners. Lori says to burn off the fuzzy stuff. I would like to add to this - go outdoors to do this.
Passing these through a flame, either a lighter flame or your torch flame, melts the fuzz into blobby lumps with the first pass, and burns it away with a second pass. I actually did use my torch, and much to my surprise, did not melt through the wires at all. Not sure what that wire is, but it is surprisingly tough.
Unfortunately, the smoke produced is oily and sooty, and rather noxious smelling, and large quantities of flaky ... ash? ... drift off and come down on everything - making a mess of the studio. I strongly suggest doing this outside, although the torch is definitely faster. The burned off pipecleaners are visible in the coffee can, ready to go.
 Next - I need some uncleaned beads. Oh, yeah, got lots of those. Hmmm - lets not use any that I'll be too upset about if this goes horribly wrong. We'll stick to round beads, spacers, nothing fancy with wings or legs or ears or etc.
 Ok - so we string the beads on the wire. A loop or a twist on the end. Hmm - this is tedious. After 3 or 4 sets, I'm not putting fancy loops on the end. How many on a strand, do you suppose? I make longer and longer sets.
Ew - this is more tedious than cleaning beads. Black soot from the burned-off pipe cleaners is getting all over my hands. I wind up doing a little springy coil thing around a mandrel to stop the beads sliding off the wire.

Finally - they are done. I put the shot in the tumbler barrel, and add the beads.
 The barrel is about 1/2 full. I add water to cover, and the smallest drop of dish detergent I can manage.

Add the lid, and set up the tumbler in my handsome, state of the art kitchen. BTW - this counter represents 50% of my food preparation surface in my kitchen. Just thought I'd share that with you.

The time is 10:40 am. I'll come back and check in an hour or so. Hey - when is the last time you saw a microwave this old? My DH had this when we met, and by crikey, it still works. DH tells me we've been married for 14 years, but when you do the math, you realize that if I'm only 27, that seems, well, illegal. :-P

dum, de dum, dum, de dum. BING! Time to check! 11: 38 - about an hour later.
This is looking fairly promising.

Hey - these aren't looking too bad!

Ah yes, the old "shot manages to jam inself into a bead" thing. Of course.

These aren't looking too bad.

And you know, in retrospect, I should have stopped here. Buuuuuut, they are not as clean as I like, and soooooooo . . . .


I rinsed out the shot, loaded the beads back in, put in fresh water, and thought I'd let them run another hour. The time is now 11:45.
 And, like the plot from a bad movie. I go have lunch, lay down, and . . . fall asleep. I awake, it is now 2:24.
Ooops.
Immediately - the beads appear to have lost something, although they are cleaned, they have lost some of their sparkle. Could they have picked up some sort of contamination from the shot, even though it is new?

Noooo - hoping against hope, I try washing, a wash in vinegar, and even a soak in CLR. Nothing helps.

Usually, CLR is excellent for stuff like this. BTW - this IS your one solution to that dull, leaden coating on opaque effetre and vetro turquoise, soak in this and it comes off. Anyone who tries to tell me about the virtues of soaking beads in a certain softdrink is subject to a diatribe on everything from viral marketplace manipulation to empty calories to corporate monopolies and more, until they suddenly remember an appointment somewhere else. You've been warned.
Anyhoo, the damage appears to be physical. The beads are actually tumbled to the point of being slightly etched/scratched/dulled. It is not actually unattractive, and I don't believe that, with the shorted tumbling period, this happened at all. Sort of beach-glass-y.

BTW - getting the beads out of the shot, the shot out of the water, and not pouring the water all over everything - sieve, plastic food container. Dump in contents of tumbler. Pick out beads. Easy.

So - verdict.
I'm not enthralled with this method - although, it absolutely works.
And a huge thanks to Lori Greenberg for the original idea, and sharing and blogging it in detail.
Here is the end result. Saleable, yes. Some lost to breakage, about 3 cracked in the tumbling, all tranparent pink lauscha with dichro. BTW - the tiny, odd-shaped petroleum green ones are markers that I use at the studio, they are not beads per se - I just threw them in as part of the experiment as I had no emotional stake in them, so to speak.

After reading Lori Greenberg's excellent blog about "tumbler cleaning" - using a tumbler to clean beads - I thought I should try it. After all, I too, hate cleaning beads. Not that I can say I actually know anyone who enjoys cleaning beads!
In a nutshell, the idea to thread the beads on twisted wire, and tumble them with steel shot, which bounces the wire around and abrades the bead release out of the beads.
I encourage you to read her original posts, which are comprehensive and well written (see link above). I'll wait.
dum dum de dum. Oh, you're back? Good. Now that you have the general idea, let me share my experience with you of attempting to duplicate her results.
First of all - assemble the ingredients. I already have the tumbler - I picked one up at a garage sale years ago. I have used it very little since then. I needed to find tumbler shot, which was easy, and craft pipe cleaners, which was harder. I eventually found those at Walmart - also called Chenille if you have to ask the staff for them. They were dirt cheap for a lifetime supply. The stainless steel shot was not - but as it is new - I do not encounter the contamination problems that Lori mentions.
 Step 1: Prepping the wire cleaners. Lori says to burn off the fuzzy stuff. I would like to add to this - go outdoors to do this.
Passing these through a flame, either a lighter flame or your torch flame, melts the fuzz into blobby lumps with the first pass, and burns it away with a second pass. I actually did use my torch, and much to my surprise, did not melt through the wires at all. Not sure what that wire is, but it is surprisingly tough.
Unfortunately, the smoke produced is oily and sooty, and rather noxious smelling, and large quantities of flaky ... ash? ... drift off and come down on everything - making a mess of the studio. I strongly suggest doing this outside, although the torch is definitely faster. The burned off pipecleaners are visible in the coffee can, ready to go.
 Next - I need some uncleaned beads. Oh, yeah, got lots of those. Hmmm - lets not use any that I'll be too upset about if this goes horribly wrong. We'll stick to round beads, spacers, nothing fancy with wings or legs or ears or etc.
 Ok - so we string the beads on the wire. A loop or a twist on the end. Hmm - this is tedious. After 3 or 4 sets, I'm not putting fancy loops on the end. How many on a strand, do you suppose? I make longer and longer sets.
Ew - this is more tedious than cleaning beads. Black soot from the burned-off pipe cleaners is getting all over my hands. I wind up doing a little springy coil thing around a mandrel to stop the beads sliding off the wire.

Finally - they are done. I put the shot in the tumbler barrel, and add the beads.
 The barrel is about 1/2 full. I add water to cover, and the smallest drop of dish detergent I can manage.
Add the lid, and set up the tumbler in my handsome, state of the art kitchen. BTW - this counter represents 50% of my food preparation surface in my kitchen. Just thought I'd share that with you.

The time is 10:40 am. I'll come back and check in an hour or so. Hey - when is the last time you saw a microwave this old? My DH had this when we met, and by crikey, it still works. DH tells me we've been married for 14 years, but when you do the math, you realize that if I'm only 27, that seems, well, illegal. :-P

dum, de dum, dum, de dum. BING! Time to check! 11: 38 - about an hour later.
This is looking fairly promising.

Hey - these aren't looking too bad!

Ah yes, the old "shot manages to jam inself into a bead" thing. Of course.

These aren't looking too bad.

And you know, in retrospect, I should have stopped here. Buuuuuut, they are not as clean as I like, and soooooooo . . . .


I rinsed out the shot, loaded the beads back in, put in fresh water, and thought I'd let them run another hour. The time is now 11:45.
 And, like the plot from a bad movie. I go have lunch, lay down, and . . . fall asleep. I awake, it is now 2:24.
Ooops.
Immediately - the beads appear to have lost something, although they are cleaned, they have lost some of their sparkle. Could they have picked up some sort of contamination from the shot, even though it is new?

Noooo - hoping against hope, I try washing, a wash in vinegar, and even a soak in CLR. Nothing helps.

Usually, CLR is excellent for stuff like this. BTW - this IS your one solution to that dull, leaden coating on opaque effetre and vetro turquoise, soak in this and it comes off. Anyone who tries to tell me about the virtues of soaking beads in a certain softdrink is subject to a diatribe on everything from viral marketplace manipulation to empty calories to corporate monopolies and more, until they suddenly remember an appointment somewhere else. You've been warned.
Anyhoo, the damage appears to be physical. The beads are actually tumbled to the point of being slightly etched/scratched/dulled. It is not actually unattractive, and I don't believe that, with the shorted tumbling period, this happened at all. Sort of beach-glass-y.

BTW - getting the beads out of the shot, the shot out of the water, and not pouring the water all over everything - sieve, plastic food container. Dump in contents of tumbler. Pick out beads. Easy.

So - verdict.
I'm not enthralled with this method - although, it absolutely works.
- I don't care for messing around stringing the beads - knowing I'll have to unstring them too later. (BTW - I think the burned off wires are completely reusable.) Picky, yes, I know.
- I don't think they get quite as clean as I like, although they seem pretty good.
- If you leave them too long - you get a soft, etched look. This is only a problem if you leave them too long. I repeat, set an alarm before you go off for a nap! Those beads that had a metallic lustre, i.e. reduced double helix, lost that lustre in the second half of the tumbling.
And a huge thanks to Lori Greenberg for the original idea, and sharing and blogging it in detail.
Here is the end result. Saleable, yes. Some lost to breakage, about 3 cracked in the tumbling, all tranparent pink lauscha with dichro. BTW - the tiny, odd-shaped petroleum green ones are markers that I use at the studio, they are not beads per se - I just threw them in as part of the experiment as I had no emotional stake in them, so to speak.

Saturday, May 01, 2010
AAAAAgggh!
I listen to audio books while I'm torching.
I'm currently listening to Dragon's Tears, by Dean Koontz.
The main character, a cop, has just found his friend dead in his home, killed by a supernatural entity - that manifested as cupboards full of tarantulas and snakes.
Just as the story is describing arriving at the kitchen, where the tarantulas are still moving around ...
A FREAKING SPIDER CRAWLS UP THE SIDE OF MY ON-TORCH MARVER AND SCUTTLES ACROSS THE TOP AND DOWN THE OTHER SIDE.
Aaaaghhhhh!
pant pant pant wheeze.
I don't need that kind of realism, thank you.
PS I beat the spider with a brass stump shaper. It was quite effective.
Subscribe to:
Posts (Atom)