Tuesday, August 14, 2012

Double Helix Okeanos - Preview

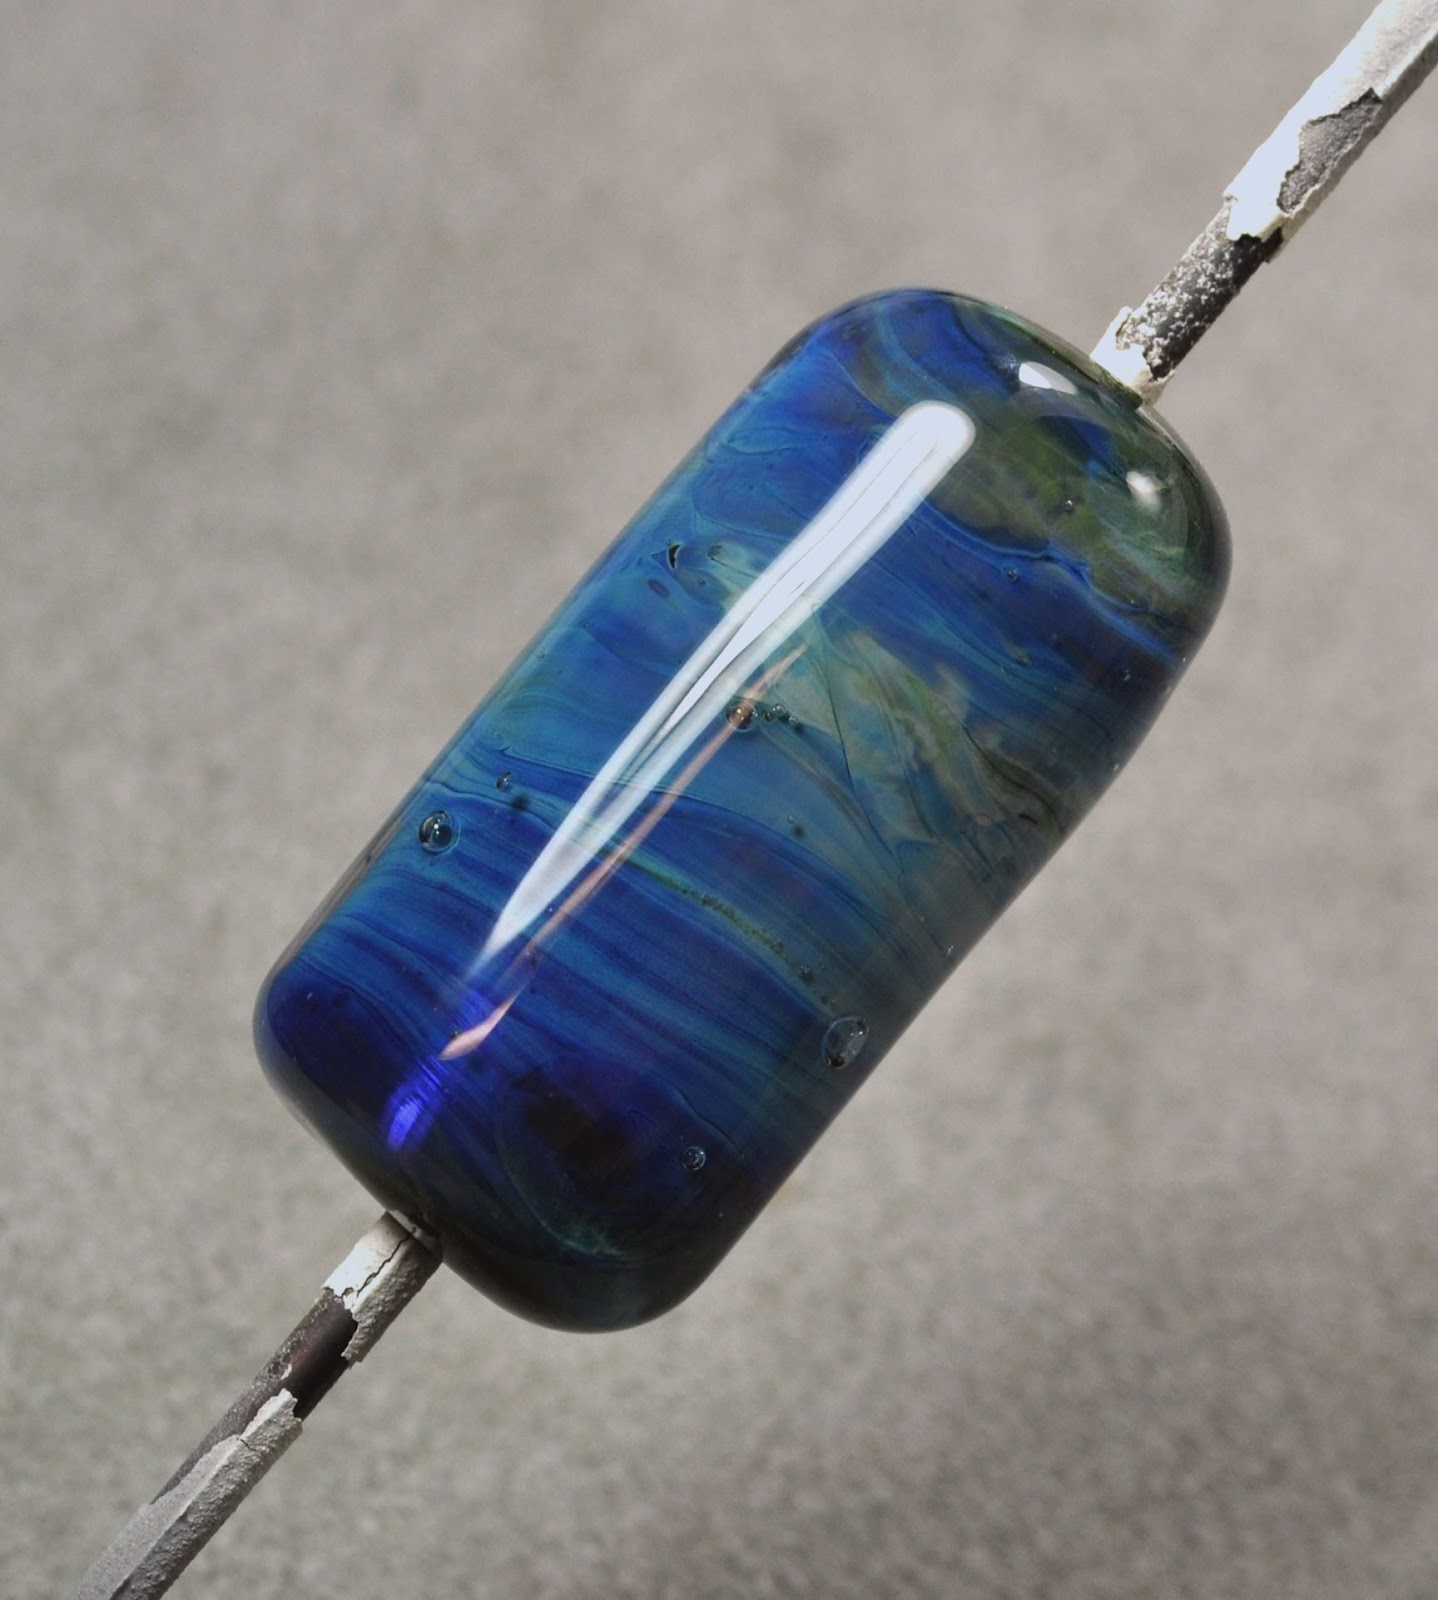
 Double Helix - Okeanos - slated for release in September - but a preview batch went to the Gathering - which is how I got it!

Their brochure describes it as a "Blue Fast Striking Terra pulled by machine."

The rods are a dark, opaque Connecticut blue (bottom right in pic.)

This is a striking glass - so get it hot, let it cook, and reheat it.


My first attempts were somewhat less than thrilling.

This one was deliberately not struck - just to see what I got.

 I struck this one a couple of times, and while it had lovely colour when it went into the kiln, and there is colour there, you need a blinding amount of light to see it.
 This is the same bead - grossly over-exposed, but you can see that there IS colour there.


 This one I heated to very hot, it was blue when I made it, as it cooled to not glowing - it looked green. I struck it lightly - it showed blues and purples, and I kilned it - and this is what I got.
 This poor bead never had a chance - this is what the bead looks like when you wing it into the kiln unstruck because the smoke detector has started to scream. No fire - just high humidity, btw.

Enough with the spacers - onto some real beads. This is a clear base, layer of Okeanos, marvered, and firepolished. No particular effort to strike it was made - it just struck by the process of being worked. Much better. Marvering helps to cool it too.


You can even see a  hint of purples in it. 


And - now we're talking! This was a base of clear, a layer of Okeanos, and encased in clear.


Frequently, I find that glass that I have trouble striking - I think it's a patience thing - behave much better when I encase them. The heat of the encasing layer does the work for me. 

Again - clear core, Okeanos, encased in clear, dots of Okeanos, and reduced. Lovely blues and aquas under that deep, deep encasing, and the dots have reduced, and fumed the clear for an antiquey look.


 This is a clear core, layer of Okeanos, mased, and struck. It had quite a bit of the brown colour when I kilned it. It's pretty dark.

 And this was a lovely looking planet - blues and greens and brown swirls - but out of the kiln - a little dark for my taste.

 This colour really shines when it is encased - beautiful blues and greens. I'd say, at this point, if I can still see browns on it when it is ready to go into the kiln - I'm not going to be really happy with the end result. It should look lighter than the end result I'm going for. With that in mind - I'll try it some more and see if the hypothesis holds up!

Sunday, August 12, 2012

Comparison: CiM Cardamom, Linen, Peaches and Cream, Coconut Milk

Just for fun, a black bead with dots, from the left, two rows of offset dots of Cardamom, same of Linen, same Peaches and Cream (you can see that it is translucent here!), and Coconut Milk.

The Linen does look like Ivory in this context. 


Friday, August 10, 2012

CiM 807: Linen

 CiM 807: Linen. This is a neutral beige colour.

This is a pale neutral that leans to grey-green. I suspect, like most good neutrals - it will look quite different, depending on which glass you pair it with. Next to white, to me, it looks like a clay-like grey with a hint of green. Next to black, the greenish tone fades away. On cream, it almost seems to blend in.

From left to right, two self-coloured spacers, and a spacer with clear dots.

It's alway good to have a good neutral - even if they aren't flashy and easy to get excited about!

Wednesday, August 08, 2012

CiM 808: Coconut Milk Ltd Run

 CiM 808 Coconut Milk Ltd Run, is supposed to be an off-white.

I personally have a lot of trouble seeing it as anything other than white.

The two beads on the left are self coloured spacers, and the third has white dots on it.

See? Effetre White Dots. 


Here, let me crank up the  contrast for you. Yeah - you can just about see them.

So, it's an off-white, but not off by much!

Maybe it has other tricks up it's sleeve?

Monday, August 06, 2012

CiM 204: Peachy Keen

 CiM 204: Peach Keen, a transparent pink that is more peachy when it comes out of the kiln.

This colour reminds me very much of Effetre 068 - which has that same light pink before working, and salmon-y colour after.

Which leads me to wonder what it will do over silver foil - because Eff 068 over silver foil is wonderful - a rich gold colour is the end result.

From the left, we have two self coloured spacers, Peachy Keen over white, and Peachy Keen over periwinkle. (Not so wonderful - what was I thinking?)


The name "Peachy Keen" may cause some confusion with the also new "Peaches and Cream" - and, in fact - the hue is quite similar between the two. But Peachy Keen is a transparent, and Peaches and Cream is an opal - so no asking for "that new CiM colour - peach something." You know - unless you are feeling lucky!

Saturday, August 04, 2012

Cardamom on Ivory


Here we go - CiM 407 Cardamom, on a base of ivory. Note the lovely separation in the Cardamom - to make a satellite view of a river basin. The effect is stronger on the dark ivory (towards the center) and almost non-existant at the ends (light ivory.) Kewel, eh?


Thursday, August 02, 2012

CiM 704: Peaches and Cream

 CiM 704 - Peaches and Cream. This is another opal glass - a translucent dark ivory or flesh tone. Well - flesh tone for some of us, anyway. Would be good for angels and mermaids, I think.

Beads were made from left to right, and you can see, the longer they were worked, cooled and reheated, the more they return to the original colour of the rod, but perhaps not quite as translucent.

I really like this, but as we know, I'm partial to the translucents and opals. I look forward to trying some sculptural stuff with it and see how it goes.

Tuesday, July 31, 2012

CiM 407: Cardamom

 Another lovely, lovely colour!

CiM 407 - Cardamom is a lovely, peaceful (peas-full?), soothing green. The kind of green that just makes you relax and go "ahhhhh."


So I started with just self-coloured spacer, on the left, below. And having done that, I made a second, and thought - I wonder how if it reacts with Ivory, like the copper-based greens. And so I added a trail of ivory onto the 2nd bead. And it didn't react in the "form-a-grey-line" way that Ivory does on turquoise, sky blue, and petroleum green. But the ivory did seem to bleed and break up quite a bit more that I expected.
 So I repeated that colour combo - this time using a different ivory - the dark ivory - in case it was an anomaly. And again, the ivory and has separated and veined.
 Here we go again, a bicone, with trails of dark ivory on the left and light ivory on the right. The ivory has done an excellent job of imitating satellite photos of river basins!

 Other side of the same bead. This bead was a core of clear, encased in Cardamom, and with trails of ivory.

Lots of interesting possibilities here! I wonder what happens if you put Cardamom onto of ivory?

Monday, July 30, 2012

Congratulations Peter and Jean!

Jean
Congratulations to Jean Robichaud of Nortel Mfg
&
Peter Norton of Nortel Mfg

for their Hall of Flame awards from the ISGB at this year's gathering.

Both your contributions to the art of flameworking are inestimable. Peter - for your torches and tools and understanding of flames and how to manipulate them.


Peter
And Jean, for your understanding of artists, and how to support them.

The world would truly be a poorer place without you both.


Sunday, July 29, 2012

Summertime - and everyone is out of town: CiM 509 Poseidon

Everyone I know is in one of three places - and none of those places are here. Three fabulous events are overlapping this year - usually it's just two events - The ISGB (International Society of Glass Beadmakers) Annual Convention and EAA AirVenture overlap every year - forcing me to have to choose between the two. This year - they ram up hard on the heels of the Canadian German Shepherd Dog Championship and Sieger Show. Pfui.


So I have stayed home, and actually, finally, in the peace and quiet of no one being around, got some time in on the torch! Which is lovely - as I have some shiny new CiM colours to try out!

First up, we have CiM 509 Poseidon. Poseidon is described as an "Opal Sky Blue." It is, indeed, a misty, translucent colour, in a soft, pale aqua blue.

In the first photo, you can see the finished beads along side the rod. The rod is quite a bit bluer than the finished beads - but as you can see from the second photo - there is a variation from left to right.
These beads were made from left to right, 1, 2, and 3. With the additional heating and cooling cycles that the 1st bead (leftmost) got (while keeping it warm while making the next one, etc.) - it has developed back into more of the blue colour that you see in the rod, the centre bead is partially blue, and the third is a little greener. This distinction is, admittedly, quite subtle, especially in "real life" and with normal lighting conditions.

This is such a pretty colour, and I am just a sucker for translucence, that this is definitely going on to the must have list.

Friday, July 20, 2012

Congratulations!

Congratulations to Tom Stanton and Curt Walton - who got their funding through Kickstarter to raise money for their project to promote a revival of playing Marbles as a kids game.

Holy Rollers - Hand Blown Glass Marbles from Holy City, CA

 With any luck, they'll be successful - and some kids will get exposed to glass and marbles and be fascinated and want to make them or collect them when they grow up. And that will be good for all glass artists!

Friday, July 13, 2012

Buy Vetro

Well - I'm about back - I managed to get a couple of sessions in on the torch this last week - after a month of being off. It's not that the broken arm actually stopped me from torching - it's more that the very aggressive physiotherapy schedule was taking all available extra time.

So nothing new to show you  - but I thought I would let you in on some insider info.

Buy Vetro glass. Stock up on it. Fill your boots. Fill your hat. Buy up those odd lots and hoard them. Candy Apple red - I'm buying it all.

The Vetrofond furnaces are still down, and the last 3 attempts - from what I've heard - have not gotten them going again. I wish I could say "buy direct from Vetro" so they could get a cash infusion to get going again - but they don't sell direct to the consumer. When they do get the furnaces going again, they will probably start with clear or black - so those specialty colours will still be on back order.

My thoughts for Vetro themselves to get going again?  Kickstarter.com. Top level contributors could something like a factory tour and a new colour named after them, entry level reward could be first opportunity to buy the new glass when it comes out.

If you all aren't familiar with Kickstarter.com - check it out. It is a way to privately fund projects - lots of independent artists and well as technology start-ups there. People describe their project and how much money they need, then set a date, and see if people will put up the money. They promise rewards for various levels of committment - i.e. small contributors get a nice thank you card or a sample of the new product, bigger investors get more substantial rewards. If the financial goal isn't met by the established date - then no money is taken from the investors (you use a credit card to pay.)

Marble artists Curt Walton and Tom Stanton are on there right now, fund raising to get to the toy convention and revive the game of marbles. For $35 you can get a set of collector marbles, for $3.500 - the artists will fly to your location and spend the day giving you a private class in marble making. Now that's cool!

Monday, June 04, 2012

What is that flame?

Alrighty then, you know everything there is to know about glass, but what about your most important tool? The flame? Just what IS a flame anyway.

Check out this video, sponsored by the What is a Flame science challenge - sponsored by Alan Alda - that explains what a flame really is, in terms an 11 year-old can understand. \

Of course, for us, it's a little different, different fuel, gas instead of wax, but if nothing else, this should help you get your head around flame chemistry and the difference oxygen makes.


Saturday, June 02, 2012

brief interruption

If it ain't one thing, it's another. Last week, I fell and hyper-extended my right elbow, causing a rather nasty sprain - which is the term for ligament damage. Whoever coined the term "only a sprain" should be taken out and shot.

Anyway, no torchy torchy for me for a few days.

On the upside, after a decade of spinning mandrels with my left hand, it was about 24 hours before it occurred to me that it was my dominant hand that was impaired - and that was only when I realized that my hand writing was suddenly waaaay worse!

So - beadmaking - good for improving non-dominant hand dexterity! Cuz ya just never know!

Friday, May 25, 2012

Glass on Stainless Steel Wire

You could call them headpins - but - um - big much?


 Uh, yeah - everything I make is super-sized.

Ok - the point is not the glass-tipped tiny headpins, I was thinking more of making things on the ends of wire and twisting them into bunches. Bugs, flowers, birds, etc. Anyway - what I wanted to find out was, could I use the new Stainless Steel Wire from Artistic wire in the flame and melt glass onto it.

Was it, in fact, real stainless steel?

First up, I emailed Artistic Wire and asked them if it was really stainless steel, or was that just the name of the colour. I got a response within hours, and they confirmed that their Stainless Steel wire is, in fact, Stainless Steel. (Also, their Brass is brass, and everything else has a copper core.) I also know, from previous experience, that most of their products have a thin nylon coating to prevent tarnishing - but I didn't ask about that.


I just cut some lengths and started working in the flame.


No noxious fumes or ghastly odors, so we seem to be good on the no-coating front.

Next lesson learned was that  the skinny, and not completely straight wires are tough to hold, and just about impossible to rotate in the hand. I wound up winding the glass around the wire, instead of holding the rod in one place and rotating the wire.You know, exactly what will get you into oodles of trouble if you try to make beads that way.

I then figured out that I could hold the wires in my rod grabber, and that was more comfortable. The wires still weren't straight - so rotating was now possible, but pointless.

But wrapping the glass around the wire works fine.


How to:

  1. Cut your lengths of wire
  2. Put a piece of wire into the rod holder if you have one
  3. Heat the end of the wire to a light glow (you can melt through the wire, just like a skinny mandrel, if you work at it, but light heating is fine.)
  4. Make a gather
  5. Touch the gather down on the wire, in from the end of the wire
  6. Wind the glass around the wire, wrapping around until you run out of glass or it goes stiff. 
  7. Heat the glass on the wire to smooth
  8. Repeat until you have a reasonable size that you like, and have worked your way over to the end of the wire
  9. Build some glass out on the end - covering the end of the wire and building up a cap
  10. Roll in a frit if you like, and melt in
  11. I heated these and pointed the far end of the wire at the ceiling to let the glass droop into a nice droplet. 
  12. Put the finished "headpin" into the kiln. I put on gloves, reach into the kiln with the wire still in the rod grabber, and let it go onto the floor of the kiln. (Edit. I now grab the wire with a pair of tweezers and use the tweezers to transfer to the kiln.)
  13. Repeat
They are fun, easy, and forgiving. You can mash the glass with some of your fancy mashers. Hey - how about using some of those brass presses that you have hanging around?

So, the verdict is, "Yes - it is real stainless steel and you can use it in the flame." Kewel. 

Save

Wednesday, May 23, 2012

Recycling Beads - Results

And here are the results of the broken bead fusing test.

Pretty awesome, I'd say! 


I was being lazy, and almost none of these were cleaned before fusing. I can grind that fused bead release away easily enough, probably use a flat lap to do that. However, I do observe that the half tubes of bead release have kept their shape, and so these still have a raised area. You could use the knowledge of that to your advantage, I'm sure. Maybe in deliberately creating a hollow or ridge or raised area, or open space. 


I seriously think these have potential.

Monday, May 21, 2012

Cracked Bead Recycling

This is a re-post from the Beadful Life - I contribute regularly to the blog there too. 


Here is a little peek at a project I'm doing today. What to do with the cracked beads.

Beads crack because they get too cold (while you are admiring them or you are making too many at once!) before they go in the kiln. Perfectly nice beads, cracked in half. Some really nice beads, cracked in half. Such a shame!

So when you collect enough of them, you can put them in the kiln and fuse them - melt them into cabochons, which will flatten the backs out and take the sharp edges off.

I'm sure there are real fusers out there who can talk about this at great length - I just melt glass in the flame, so I'm not doing anything fancy.

If you have a collection of half beads and want to try this, here's the low-down.


Grab a kiln shelf - one may have come with your kiln, otherwise, get one from your kiln supplier, glass supplier, or a ceramics place. Make sure it fits in your kiln with room to spare. Everything gets bigger when it is hot.

Get some fibre paper, same sources as above. Cut a piece of the paper the same size as the shelf, and put it on the shelf. It probably came in a roll and wants to curl - once you have the beads in place, they will hold it down, so just weight it down for now.

Choose beads of more or less the same size, or at least, thickness. If you have super thick beads and thin together, by the time you have flatten out the fat ones, the thin ones are going to be too thin, I think. 

Make sure your bead halves are clean and dry. You can grind off the bead release that might still be on them, or leave it - if the glass is opaque and you aren't going to use them so that the back can be seen, who cares. Otherwise, remove it. Not that I was that ambitious this morning.

If you do leave bead release on them, don't have it be damp. Damp + high temps = steam = bad things in the kiln.

Arrange them on the shelf, with lots of room.

Put them in the kiln. They are really small - so you can just zoom up to full temp. Ramp up at full speed to 1600 F.

Start peeking at about 1350 degree. Open the kiln door and have a quick look.  You probably won't see any movement. You will notice it is hot and the glass is glowing.

Keep checking, every 30 - 50 degrees. You'll notice they are rounding a bit around 1420 +. Keep going until you think you like what you see. These in the picture went up to about 1480.


When they are done, you want to "crash cool" to 1000 degrees. This helps to prevent accidental devitrification.

Crash cooling consists of opening the kiln door and letting the temperature drop.

When the kiln gets down to 1000, then run a regular annealing cycle, i.e. hold at 970 for 15 mins, ramp down 100 degrees per hour to 815, hold 30 mins, ramp down 100 degrees per hour to 500, and shut off, or whatever you prefer.

You may have to open the kiln door and cool again, because as soon as you close it - the temp will climb back up. Some kiln controllers get a little upset if the temp climbs to more than 100 degrees above what they are set for, so you might see an error message. If so, just restart your annealing cycle again.

The above picture was shot at about 800 F - no glow on the glass.

I'll show you the results when they have cooled down. Too bad I didn't remember to shoot them before starting the experiment.


Saturday, May 12, 2012

Spiral Tool

This is a cool tool that totally rules, it will make you drool.


I LOVE this tool - I am using it on everything. It's just a simple spiral. It works well - doesn't tend to stick to the glass, it just totally rocks.

This was my first use of it - on turquoise and copper green - if you care. 


I forget what these were - Sasha's silver on the bottom and Dalai Lama on the top, maybe?
 This is Dalai Lama on the top, and not sure about the bottom. The Dalai Lama struck beautifully - best I've ever gotten - probably due to the rapid cooling. To make the spiral tool work on a hot, soft bead, I place the back of the bead on torch marver. Here too, I started adding the wavy Micheal Barley tool.
  Here we go again - spiral and wavy. The bead itself it Vetro Black and Ivory, with all 4 of the frits I've been playing with lately (TAG Taxco and Deep Purple, Belladonna Royal Purple and Honey Glaze). Melt in, spot reduce, clear encase, mash, spiral.


 This is also all 4 frits, on Vetro black, encased, mashed and spiraled.


White core, honey glaze rod, dichro, clear encase. Let drip, mash, apply spiral. 


Here is the spiral again, also the wavy tool. The spiral is awesome. I'm putting it on everything. There's a serious danger of me completely overdoing it. How out of character is that? ;-)