Showing posts with label tips. Show all posts

Friday, November 10, 2017

More thoughts on identifying mystery rods

Ah - those mystery rods of glass. You were sure you would remember - so of course, there is no label!

For the transparent rods, clear and very pale colours, sight down the length of the rod at a bright light - lightbulb, fluorescent fixture - whatever ya gots - and check the colour you see at the end of the rod. It can tell you a lot.

First up here - from the Double Helix corner, is  handful of Aion2. Looking through the rods at the light, it looks pretty clear, so that's no particular help.


These rods also appear clear - there is no trace of unexpected colour in the light showing at the end. This is Zephyr - the clear of choice for many.


Here, however, are clear rods with a decided aqua colour when viewed end on. This is Aether - another clear from Double Helix, but it responds differently to the silver glasses. The difference between the Zephyr and the Aether is quite striking. Knowing this - you need never get these two mixed up again!


Remember this trick when you have very light transparent rods that you want to positively ID. It is particularly useful for very pale batches of unstruck rods of striking colours like the Effetre Electric Yellow, Orange, and Striking Red. Just sight down the barrel of the rod ... 

Monday, December 02, 2013

The Elements of colour

Here's a nice little article about what metals are used to colour glass. Remember - this is geared towards collectors of historical pieces. Cobalt is not used to colour modern blue glass, neither is uranium.

http://www.journal-news.net/page/content.detail/id/601658/Take-a-look-at-the-science-behind-your-colored-glass.html?nav=5016

Tuesday, October 16, 2012

Goldstone Stringer

If you make your own goldstone stringer - have you tried making it with an encasing colour OTHER than clear?

This is handmade goldstone stringer, encased in Rubino.

Who'd a thunk it?

I got this from a couple of different classes I've taken. Maybe everyone but me knew about it.

To make your own goldstone stringer, buy a chunk (or chunks) of goldstone. Select a piece about the size of a walnut, or perhaps a little smaller if this scares you.

(If your piece is too big, wrap some sturdy fabric around it, a chunk of leather is great, and put it on the floor and hit it with a hammer.)

Pop it in the kiln to warm up - you don't have to put it in a cold kiln, just put it in the kiln at your regular temperature, and let it warm up for a while. 15 mins or so - longer is ok. (I once put a piece in the kiln, forgot about it, was reminded when I emptied the kiln, left it there, forgot it again, kept doing that for a week! It was fine!)

When you are ready - punty onto the chunk in the kiln. To do this, take a nice long piece of clear, melt the end, reach into the kiln with the clear, and stick it onto the chunk. Take it out of the kiln and go to the torch. Start way out at the end of the flame, warming it.

You want to warm it enough to soften the goldstone and refine the shape before encasing, as it is probably pretty lumpy and irregular. Warm it slowly and keep it moving. Don't let it start to glow red, especially on the edges. As soon as it is soft enough to shape, squeeze it into a brick with your mashers. As it approached the right temperature to work, it will look dull and dark - but it will be soft enough to move, BEFORE it starts to flow and glow. This is important. If you get it all flowy and glowy before encasing - it will not have as much sparkle. Continue to work up in the cool, end of the flame. Patience is key here.

As soon as it is mashed into a shape that is reasonably regular and that you can encase, go ahead and encase it. As I mentioned, it doesn't have to be with clear. These pics show Rubino Oro over goldstone and it is pretty fabulous.

Once it is encased, add another punty (handle) to the opposite end, and now you can start heating. Again, the appearance of the glass will be deceiving. It will stay looking dark for a long time while you drive the heat into it. (It's ok to go for glowing now.) Be sure and wait until it is soft right through the middle before you pull - so that you get a nice, even stringer.


Don't use goldstone beads that you might find. While these are the same thing - Goldstone - you don't know if it is the same COE - if it is compatible or not.

Why make your own? Other than cost? Commercial goldstone stringer tends to be less sparkly, and of course, doesn't come in colours. It can be hard to find too. Goldstone rod - also encased, but a thicker rod - sort of like filigrana - tends to be as shocky as all get out. The flat ribbon is fabulous, but, colors, cost, etc.

So, if you have that chunk that you bought a while back, and haven't worked up the nerve to use, it's time to dig it out, warm it up, and encase it to make something fabulous!

Wednesday, October 03, 2012

Making Better Flowers & Leaves

Want to make your flowers and leaves more realistic looking? Here's a video that will give you a deeper understanding of how petals and leaves grow and form patterns.

It's not glass - but it's good stuff and anything that helps you understand the world is a good thing. ;-)

Plus, I think it's just really, really cool.


Friday, May 25, 2012

Glass on Stainless Steel Wire

You could call them headpins - but - um - big much?


 Uh, yeah - everything I make is super-sized.

Ok - the point is not the glass-tipped tiny headpins, I was thinking more of making things on the ends of wire and twisting them into bunches. Bugs, flowers, birds, etc. Anyway - what I wanted to find out was, could I use the new Stainless Steel Wire from Artistic wire in the flame and melt glass onto it.

Was it, in fact, real stainless steel?

First up, I emailed Artistic Wire and asked them if it was really stainless steel, or was that just the name of the colour. I got a response within hours, and they confirmed that their Stainless Steel wire is, in fact, Stainless Steel. (Also, their Brass is brass, and everything else has a copper core.) I also know, from previous experience, that most of their products have a thin nylon coating to prevent tarnishing - but I didn't ask about that.


I just cut some lengths and started working in the flame.


No noxious fumes or ghastly odors, so we seem to be good on the no-coating front.

Next lesson learned was that  the skinny, and not completely straight wires are tough to hold, and just about impossible to rotate in the hand. I wound up winding the glass around the wire, instead of holding the rod in one place and rotating the wire.You know, exactly what will get you into oodles of trouble if you try to make beads that way.

I then figured out that I could hold the wires in my rod grabber, and that was more comfortable. The wires still weren't straight - so rotating was now possible, but pointless.

But wrapping the glass around the wire works fine.


How to:

  1. Cut your lengths of wire
  2. Put a piece of wire into the rod holder if you have one
  3. Heat the end of the wire to a light glow (you can melt through the wire, just like a skinny mandrel, if you work at it, but light heating is fine.)
  4. Make a gather
  5. Touch the gather down on the wire, in from the end of the wire
  6. Wind the glass around the wire, wrapping around until you run out of glass or it goes stiff. 
  7. Heat the glass on the wire to smooth
  8. Repeat until you have a reasonable size that you like, and have worked your way over to the end of the wire
  9. Build some glass out on the end - covering the end of the wire and building up a cap
  10. Roll in a frit if you like, and melt in
  11. I heated these and pointed the far end of the wire at the ceiling to let the glass droop into a nice droplet. 
  12. Put the finished "headpin" into the kiln. I put on gloves, reach into the kiln with the wire still in the rod grabber, and let it go onto the floor of the kiln. (Edit. I now grab the wire with a pair of tweezers and use the tweezers to transfer to the kiln.)
  13. Repeat
They are fun, easy, and forgiving. You can mash the glass with some of your fancy mashers. Hey - how about using some of those brass presses that you have hanging around?

So, the verdict is, "Yes - it is real stainless steel and you can use it in the flame." Kewel. 

Save

Monday, May 07, 2012

Learning Something New

The last four days of classes were fabulous! There's a bunch of reasons to take a class - learn a specific technique, learn a new approach, change your perspective, put some juice back in your mojo - but the best is mostly too much to hope for - when you get a great group of students and awesome teachers and you have great synergy and everyone learns and new things get discovered.

There was so much good stuff - I'm having a hard time figuring out what to focus on here!

But these past days with Jeri Warhaftig and her husband Neil - were fabulous - we covered soooo much.

Focus. Pick one thing.

Ok.

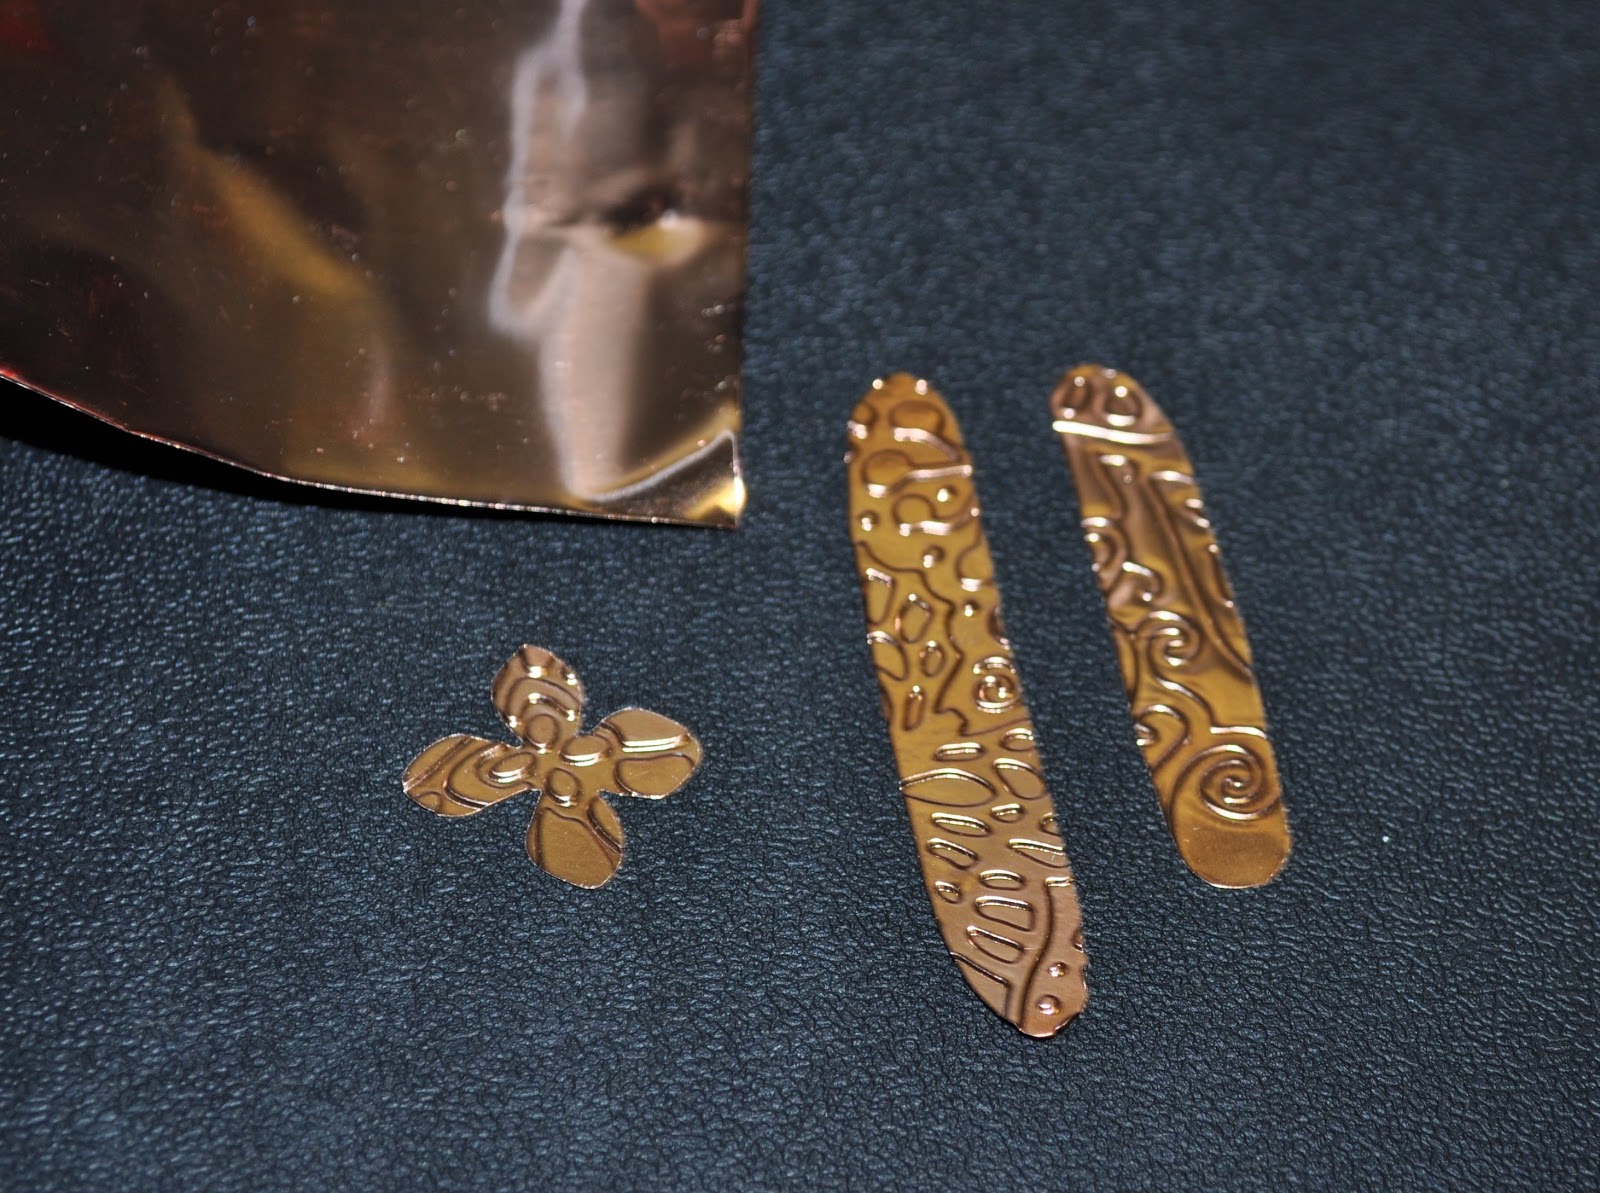
s32187 Tools - Sizzix Vintaj -  BIGkick - Embossing and Shape Cutting Machine (1)Copper foil inclusions in a lampwork bead. Somewhere, early in the process of talking about including copper foil in a bead, I had the inspiration to try embossing the copper foil using the new Sizzix/Vintaj Big Kick Machine.(Available from beadFX - but instore only.)

So we scooped up some copper foil, and headed over to the other class room where the BigKick is stored, and tried both the Embossing Plated and the Etching plates. The lightweight 40 gauge copper that we were using works beautifully - taking a nice crisp pattern from either process.


The long oval on the far right is "Etched" - it is a single, rubbery plate with the design as a series of lines - it makes a pattern that is thin, raised lines, as you can see. The long oval in the centre is using the "Emboss" - which is a folder, with two metal plates, one a reverse of the other, and it gives you a pattern that is less about lines and more about areas. The little flower is also using the Emboss plate.


So - does it hold up to being included in a bead? Can you see the pattern, or does it degrade?

Yes it does hold up! Beautifully, as a matter of fact.


And there are oodles of patterns to choose from!

Remember - you read it here first! If you were looking for justification to purchase the Big Kick machine (or any of it's siblings) - here you go.

Wednesday, September 14, 2011

Mixing Colours


A recent post about hand-mixed colours got me inspired to try a combination of CiM Cirrus and Eff Cobalt.

Of course - I chose Cobalt blue - a colour which simply will not reproduce on the screen. Sigh.

However, I was really pleased with the result. The Cirrus lightened up the cobalt enough that it really is a wonderful blue in real life - a real "Noxema jar" blue.

It is encouraging enough that I'm going to try more of it.

If you want to mix your own colours - you can mix just enough for a single bead by starting as if you are making a twisty - layering one colour on another - without having to be particularly neat about it. Use the second colour rod as a handle - and heat the mass of glass - just like a twisty - but not quite as hot and soupy. Hot enough to move the glass though. Then start twisting, but NOT pulling, just twist it in the flame. If it gets saggy and drippy - take it out of the flame, double it back onto itself, and keep twisting and folding it. If you blend this a lot, you get a very homogenous colour - if you don't blend as long, you get a more streaky colour. You can see from the bead above - this was very close to being completely blended. You can then pull it out into a fat stringer for later use, or, my preferred method, disconnect one rod, grab a mandrel and wind the mass of molten, variegated, glass onto the mandrel - and shape from there.

This is especially good for those uber-dark colours, Rubino Oro, Leaky Pen, Black Currant, that don't display well on their own.


Friday, September 02, 2011

More on Belladonna Black Diamond

I did say that I wanted to test the new Belladonna Black Diamond when pulled out into very fine strands - as it is supposed to stay a true black.

The thicker black lines, above, you can see them on the side of the bead closest to you, were from stringer about 1.5 - 2 mm thick.

These thinner lines were from stringer that is literally thinner than a hair - whippy, bendy thin. To pull these, melt your gather of glass, not a very big one, and then pull very fast. Careful where you put them down. If you put them down directly on the bench, you may not be able to see them, or even to pick them up again.

To use stringer this thin - don't put it in the flame. Heat the bead to a light glow, and lay the stringer down on the bead, out of the flame, letting the heat of the bead attach the stringer to the bead.

Anyhow, you can see - the stringer has remained black, although a little less saturated in a couple of them - but no hint of purple.

Monday, March 07, 2011

Video - Sculptural Butterfly

Here's a very good video of making a butterfly sculpture in soft glass. The technique is very nice and makes it look easy.


You may be surprised that the artist can leave the wings out of the flame and doesn't keep them warm. One of the keys to working this way is that you plan your work so that you can finish an area and let it cool, and NOT go back in and re-heat it. Once it cools down, you never go back.

Notice that at the head of the butterfly - the artist leaves a skinny bit of glass sticking out? Makes it look like a beak - so the initial stages look more like hummingbird. Then the artist reheats this to add the antennae. This is the other key to working this way. Any place that you need to go back to, you need to leave a projection of thin glass, thin enough to heat without shocking. Think of the difference between heating a stringer and a rod of glass. The stringer is not going to shock when you put it in the flame, because it is thin.

I only wish this video had been shot through a filter so you could see better through the flame. But it is still very worth watching.

Sunday, November 28, 2010

Odds and Ends - the Using Up Thereof.


After you've been lampworking for any length of time, you start to wonder - what do I do with all these leftover ends? You try using them, but then they aren't the colour you want right now - or you find you've made truly hideous beads because you were trying to use up the ends.

You try sticking them together, end to end, but they are shocky and if you aren't using them right away, it doesn't really seem to buy you anything.

And the rod grabber tool is great for using up ends, but still - they keep accumulating.

One thing you can do to make these ends more usable is to re-anneal them. Part of the bummer about trying to use them is that they keep shocking and dropping a tip off the end. A half-inch falling off a 4 inch rod is more annoying than falling off a 13 inch rod.

In particular - I accumulate a lot of ends of clear and black. They are very reusable, but the shocking is annoying, so every once in a while, I will pile them in the kiln, and run an annealing cycle - same cycle I use for beads (and if I don't have quite as much as this, I might do it when I am going to make beads.) I don't care if a few of them shock and break, so I don't worry about a slow ramp-up. I just put them in, and ramp up at the usual speed.

When they come out, they are significantly less shocky - and my black and clear ends go and stand in a nice little can for re-use. Punties, bases for more expensive-glass beads, encasing stringer, twisties - lots of uses.

I find they do better on the floor of the kiln. Occasionally I have annealed a shocky batch of full-size rods, and I have to put them on an angle on the rod rest to make them fit. In that case, they tend to come out with a distinctive bend in them. At least then, I can tell which ones have been annealed!

Friday, November 26, 2010

Making Multiple Beads on a Mandrel

You may have noticed this particular picture the other day, and wondered about making multiple beads on a mandrel. The advantages to making multiple beads on a mandrel is that it is easier to make a matching pair, because the first one is right there to compare, and it can be a time saver for making multiples, as you can let one bead cool down a bit while you work on the next one. It saves dipping time and trips to the kiln. An hour of beadmaking like this can leave you with a pretty daunting pile of beads to pull and clean, however.

Two tips will help you fill up the mandrel with beads and have you start looking for taller bottles for your bead release. (I have mine in a small orange juice bottle - so I can get a nice long dip. For production work, I can get 6-8 on a mandrel)

Sorry, three tips.

1. Make them close together. Seriously. Like in the picture. Overlapping heat from making the next bead helps to keep the previous ones warm. This is anti-intuitive, and a little scary - you worry about losing control and sticking them together. Trust me - making them close together really helps.

2. Keep them all warm - doh. But - never have more than one warm enough to move at a time. You can't balance and round out two moving-hot beads at the same time. Make a bead. Balance and round. Keep rotating - let it cool to solid, make the next, balance and centre, let cool. Rewarm the first. Make the third now that #2 is solid and #1 is warm. While #3 is cooling - make sure #1 and #2 are warmed up - but keep the rolling rhythm of the mandrel tuned to the still soft #3 bead. When it is solid, start on #4, - etc.

and the 3rd tip. If you are trying to get them all the same size - which - looking at the pic above, I wasn't, but if you are - make your decision about the size of the bead and if it needs more glass while both beads of the pair are the same temperature. If one is glowing and one is not, wait for it to cool down, or warm the other one up.

Whether this is because the warm one is expanded with heat (I personally doubt this is a big enough phenom to see) or the optical illusion of a glowing object looking larger (my favored theory), you can't get them the same size if you keep adding glass to them when they are not the same temperature. You'll add glass to the smaller-looking cool bead, and when you have melted the trail of extra glass in, it will now look bigger than the other, now cool bead. So you will add more glass to that one, and ad nauseum. Your earring pair just turned into matched book ends. Or curling rocks.

Once you get the hang of it - you'll be whipping out long mandrels of matching beads.

Wednesday, November 17, 2010

Implosions: Some Tips

A reader asked - Do you have any tips for implosions? As a matter of fact, I do. I don't pretend to be deeply awesome at them. But - these little implosions are now fairly easy to do and I can whip one off with one hand and then stick it on the bead I'm keeping warm with the other hand.

The key, I believe, is volume. Volume of glass. More glass = better effect.

Most of the implosion instructions I have seen tell you to put a pattern of dots on the disk, and to implode that. I found I got much better results after I started jamming the disk into the frit. Many more "dots" and lots of glass to move.

Some of these photos are utterly ghastly - I apologize - but to illustrate my point.

Start with a rod of clear, and create a disk on the end. You can let the end get hot and push down, or build up like making a disk. Or a bit of both. It helps if it is centered - it's easier if it is, but don't worry too much if it's a little off.

See - not completely centered. Definitely out of focus. Try shooting pics with one hand while keeping a bead warm.

Key to remember - you are working on the back of the implosion most of the time, the top will be on the side of the clear rod in your hand.

With the surface hot - glop on some frit. Do a couple of layers. It can be two different colours even.

And melt it it. You can marver it to melt it in faster and smoother.

That's my "assistant" in the background, by the way - the rod warmer - doing it's rod-warming thang.

So - now the frit is melted in.
Rotate and heat on one side. The idea is to direct the heat where the arrows are pointing, from the center out to the side.

Rotate the disk constantly, and hold at a bit of an angle, so that the glass will start to flow down. First it will form a cup shape. You have to rotate it to keep it on center.

Note the angle of the rod in relation to the flame. The flame is hitting the far side of the disk, and only about 1/3 of it.

See how the center is still dished in?

Then it will dome over as it continues to flow.

And you keep going, and it will turn into a gather, with the implosion inside. It's hot ...
And now it has cooled. You can flatten the back side a little, and add a big dot of colour and flatten out to form a base.
And cooler.
And the finished implosion - as a bead. I stuck it on a mandrel, and looped the clear around to make the rest of the bead.

More dots make a more dramatic effect - and bigger volume dots of strong colours will show better. Don't be stingy with the disk either. And if you need a bigger dome - melt more onto the top from the rod end.

Be gently flattening the bottom - you don't want to loose your definition in your implosion.

Hope that helps!

Tuesday, October 26, 2010

Caveat Emptor - Or, If it looks too good to be true ...


If it looks too good to be true - then you missed the fine print, or ... the vendor is lying.

To be fair, the seller might be just an idiot. ;-)

Case in point. A student brought me this little vial of "gold flakes." We'd been discussing using gold and silver on beads - and she saw this on ebay for 99 cents. "Nothing to lose," she thought, and bought some.

Except, it's not gold. It is the stuff you get for imitation gilding on furniture and picture frames, stuffed into a tiny bottle. It goes black in the flame.

So, 99 cents is a relatively cheap lesson, except she didn't say how many she bought, or what the shipping was.

Real, 24 kt gold is expensive, and not available on every street corner.

And you do want pure gold or pure silver.

There are outside-the-box sources for gold and silver. The collectible 5-gram ingots of pure gold or pure silver can be used for fuming - scrape off a sliver of the metal or file some off and melt the filings and use from there. I suppose you could hammer it into foil too - but I think that immediately you are going to spot how much work that would be.

One of those bars will last you a very long time. I have a commemorative 1-ounce ingot of fine silver that I picked up at a garage sale for $5. I seriously expect it to last the rest of my life. Now that was a bargain.

Or, you can buy direct from the refiners. Eliminate the middle man.

And if you are thinking that it's a cute little bottle for 99 cents - I'm pretty sure you can do better.

;-)