Sunday, October 31, 2010

Effetre 088 - Dark Steel Grey


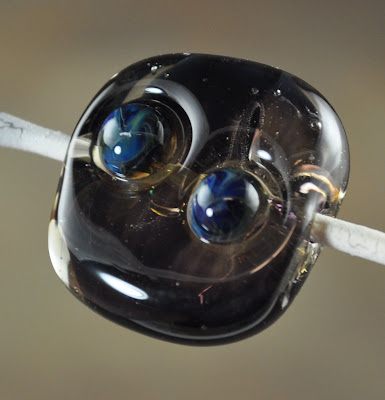
Third in the Effetre family of transparent greys is 088 - Dark Steel Grey. This too, is a non-neutral grey, although not at obviously non-neutral and 084 Light Steel Grey.

It is a darker grey, and while it appears greenish in these photos, and that is accurate - you don't really notice it so much as you do with the 084 - where you definitely think - hmmm - not so grey.

Again, it is a nice clear colour. Why can't they make the clear as transparent as the pale transparents?


This is a self-coloured bead.

And this is over white.

Nice transparent - assuming you have a use for grey.

Effetre 048 - Transparent Grey

Back in August, I reviewed Effetre 084 - Steel Grey - and remarked that it really isn't a neutral grey - more of a greenish grey.

In fact, if what you want is a purely neutral, middle-of-the-road grey - your colour of choice would be Effetre 048, Grey.

This pale, transparent grey is very much the neutral grey, neither shading to cool tones or to warm - which is to say, neither bluish nor brownish in hue.


It's really wonderfully clear too. I bet it etches nicely too.

And, of course, over white.

This is a nice choice for a sophisticated colour set that maintains a pure, neutral grey.

Tuesday, October 26, 2010

Caveat Emptor - Or, If it looks too good to be true ...


If it looks too good to be true - then you missed the fine print, or ... the vendor is lying.

To be fair, the seller might be just an idiot. ;-)

Case in point. A student brought me this little vial of "gold flakes." We'd been discussing using gold and silver on beads - and she saw this on ebay for 99 cents. "Nothing to lose," she thought, and bought some.

Except, it's not gold. It is the stuff you get for imitation gilding on furniture and picture frames, stuffed into a tiny bottle. It goes black in the flame.

So, 99 cents is a relatively cheap lesson, except she didn't say how many she bought, or what the shipping was.

Real, 24 kt gold is expensive, and not available on every street corner.

And you do want pure gold or pure silver.

There are outside-the-box sources for gold and silver. The collectible 5-gram ingots of pure gold or pure silver can be used for fuming - scrape off a sliver of the metal or file some off and melt the filings and use from there. I suppose you could hammer it into foil too - but I think that immediately you are going to spot how much work that would be.

One of those bars will last you a very long time. I have a commemorative 1-ounce ingot of fine silver that I picked up at a garage sale for $5. I seriously expect it to last the rest of my life. Now that was a bargain.

Or, you can buy direct from the refiners. Eliminate the middle man.

And if you are thinking that it's a cute little bottle for 99 cents - I'm pretty sure you can do better.

;-)

Sunday, October 17, 2010

Double Helix Aion 2


Not a comprehensive review - just a quick boo at some beads I whipped off last night.

This is Double Helix Aion 2.

The base is CiM Black Currant, actually, a trail of Aion 2 around the bead a couple of times, melt in, and a brief reduce, and encase in Lauscha clear.

Notice the two right end beads? They appear more greyish?


Here's a close up. In this case, when I melted the Aion2 and put it down, I had the oxygen turned a little down, so the flame wasn't completely neutral - and it has gone more muted in the colours. I don't care for this as much.


It wasn't much - I hadn't actually noticed it until I adjusted the torch.


This third pic shows a close-up of one made with the flame a little on the oxydizing side - erring on the side of caution, then reduced, then encased.

Quite dramatic the difference in when the reduction is applied - after the glass is melted in, as opposed to during melting it.

Saturday, October 16, 2010

Effetre 254: Orchid/Purple/EDP/Evil Purple

EDP - Evil Devitrifying Purple (EDP for short). Evil Purple. Effetre 254. Oh yeah - there is no one on the fence about this colour!

With a reputation for being hard to work, a tendency to shockiness, a thoroughly intimidating price tag and seemingly unpredictable results - many folks love to hate this glass.

(It's made with gold - btw - hence the price.)

But me - I love it!

Here's the first dirty little secret about EDP - not all batches are created equal. So when you find a batch that is well behaved and works nicely - stock up!

For instance - I recently came across a couple of pounds of a very-well behaved batch - so I bought it all. It had been lying around for a couple of years - so it is an older batch. Admittedly - I do go through a lot of it in my production work - so for some of you - 2 pounds might be a life-time supply. For me, about 6 months, maybe less.

EDP is known for 2 properties: it is very reactive and can do many interesting things other than lying around being purple, although that is not a bad thing in and off itself. I'm not talking about it's reactive properties at the moment though.

The other thing is does is "de-vitrify" - which means to loose it's glossy look. (I've had someone with rather more knowledge than me tell me that de-vitrify is not technically correct - but he didn't know what else to call it either.)

When I first started - I thought of it as "self-etching" - it would go dull and matte, instead of glossy.

I found that when I worked it normally - make a bead, and then in and out of the flame, keeping it warm while I worked on it, decorated it, it went all matte.

But if I just wound off a spacer and stuck it in the kiln - it was a lovely, deep, shiny purple. Hmmm.

So this is the key - the gentle rewarming, kissing it with a flame, after it has cooled to not-moving, makes the surface go dull. If, however, the last thing that happens to it before it goes in the flame is that it is heated to glowing, it will come out shiny.

It's that simple.

So that does mean - there are some things you just can't do - like a shiny bead with raised dots, because getting the base bead hot enough to make it shiny will melt the dots in. Well - not impossible maybe, if the dots are really big, but you get where I'm going with this. A matte bead with shiny dots in another colour - very do-able - nice contrast too.

The other thing to bear in mind is that some batches will de-vit more than others. I've had some that are so extreme - that it causes the other glass on the same bead to de-vit (which leads some weight to the it's not really de-vitrifying argument).

I've had some rods that you could just hold in the flame under a bead with no EDP in it, and cause the whole bead to go matte.

Here is the de-vit'd beads from the above-mentioned well-behaved batch. These show a very subtle, soft effect, and not so much of the "chalkiness" that some batches have. Hence part of the reason why I'm liking it.


And these are the ones that are nice and glossy. Note the dots - Eff. Turq and CiM Celadon - nice separation of colours to give a two-colour dot effect.


And here is a close up - nice and glossy. This batch seems also more streaky than most. (That powdery marking is powder - bead release from the bottom of the kiln.)


Don't be afraid of the evil purple. Heat the surface to glowing as the last step before you kiln it, and you'll have lovely, glossy purple beads.

(What about encasing? - I get asked. It goes streaky and not as vibrant if you encase it. Not a bad thing, but not the same intense purple.)

Friday, October 15, 2010

G109 Chalcedony (CoE 96)

I got a couple of rods of some interesting stuff - non-104 COE glass - but I thought - maybe if I just use it sparingly ... well - you know me - sparingly is not a word in my vocabulary - but anyway - thought I'd try.

This rod was labeled Chalcedony G109 - which I take to mean is the Gaffer 109 glass, but that's a guess. Chalcedony - btw - assuming it is pronounced the same way as the mineral - would be pronounced kal-SED-o-nee - in complete opposition of the way it looks.

So first up - I tried a thin trail of it on clear. My, my - does that ever look like the old raku / iris orange/ amber purple family of glasses.


So next up - I tried it on black. Oooo la la!

I liked it so much, I tried it again! Now - these were brighter for sure when they where hot, but still - liking the colours!


Alrighty then - how about a base that is black on one half and ivory on the other, and trail the Calcedony on it?

Yes, yes, yes!


And here's the other side! Oh baby!


Definitely liking this! - the colours came up fast and easy! I did get a small gather very, very hot - clear hot - before starting, and wound off a very thin spiral onto the bead. That intense heat is what is making the colours happen so easily - I think.

No issues with cracking - given that it is very small percentage of the overall bead, and not encased, I think they will be fine!

Sunday, October 10, 2010

Bowl Push - The Impact Crater Tool


This is the bowl push - pretty much the exact opposite of yesterday's tool - the ring push.

It is also a fun tool.

You can make impact craters with it!


The one I got is 8 mm - not sure if they come in other sizes.


Oddly enough — the holes/craters, depressions that it made measure out to about 5 – 6 mm — although those are still large on the surface of a bead.

What can you do with it? Well - more stuff than I think I've thought of yet - but this is a fun effect. This was a bowl push, a dot of clear, and finish with a ring push.


I like it. It has a very "finished" look to it.

A big ol' bead covered in these could be a lot of fun!

And it is certainly a way to differentiate your dot beads from all the other dot beads in the pack!

Saturday, October 09, 2010

Ringed-Dot Push Tool

This is a fun tool.

Fun to use, and fun to look at the results of - for reasons I can't quite put my finger on.


I don't know why - it just makes me smile to see these - crop circles - in the glass.

It's a crop circle tool.


See - isn't that fun?

Here's a few more shots of the tool. It comes in, so far as I know, 3 sizes, 6 mm, 8 mm, and 10 mm. The one I'm using here is the 8 mm.


Nicely finished edges.
Nice deep bowl.
Nice comfy handle - of the heat resistant squishy foam.


This is combining with dots - I used the tool first - then put a dot in the middle of the ring.

This was putting the dots on first, then using the ring push. Notice how nice and roundy the dots are? (The bead is actually cracked all to heck, but that's from me admiring it and not getting it into the kiln - not the fault of the tool. Well - it is the tool's fault - but not really. So there.)
And here's some plain organic fun! It started as a brick shape - and is now all squidgy and organic. (Terra 2 Filigrana stringer on clear, if you wanted to know.)

Me likey - gonna go get the smaller size - I know - what a shock - me going for a smaller one! - and try making googly fish eyes.

Probably on a fish bead. Although "googly evil eye beads" is also an appealing thought. Those traditional evil eye beads - the protection beads - they are so serious. They need some lightening up.

Friday, October 08, 2010

Cylinder Speed Shaper


This was not my first shot at using this tool - I had a go at it quite some time ago, as a matter of fact - when it first came out - and could just not get anything I liked with it. Frustrated and baffled - I put it aside.

However, the latest Flow Magazine (if you don't have a copy yet - why the heck not?) has 3-page article on just exactly how to use this baby.

So - having read that article (and the entire magazine, actually, cover to cover, in one sitting - at a doctor's office. Thank goodness I had taken a magazine, as they don't put magazines in that office any more - they spread germs. No - magazines don't spread germs - waiting an hour and a half around sick people spreads germs. Grrrrr.) - I was ready to try it again.

The article is very good, and very comprehensive, and so I won't repeat it here, except for the key sentence which made the whole thing make sense for me.

With the two adjacent sides of the groove in contact with the glass, the cylinder is brought into shape more quickly and efficiently than on just a single, flat surface.
Once I stopped thinking of it as a mold, and started thinking of it as marvering in two planes simultaneously - bingo - it snapped into shape.

Here's a few more pics of the tool.

This shows the inside - the v-shaped channel and the ends with the cut-away for the mandrel. The cut-away is large enough to not bang the bead-release off the mandrel. This is a good thing.


Solid construction - wood handle is nice. It is - overall - a trifle heavy. Could almost use a counter-weight in the handle.


Here's another view of the channel - from the end.


I will say - I have seen a number of these tools laying around at friends' studios, and they have a weakness here, and here, (at the arrows) - I see them with the graphite ends snapped off here all the time. Mind you - having worked with the tool a bit now - I'm not sure that it matters or impairs the function.


So here's a bead - and it was fast and easy to make - and yes - as promised - the ends are squared up and quite crisp.


You can make bicones too.


Adjust your angle of attack - so that the bead is tapered - instead of a cylinder. This is the function of the angled end.


One of it's suggested uses is for making long beads for pens, letter openers, etc. I would suggest that you use a Sharpie(tm) pen to mark lengths on the tool - just write right on the graphite - so that you don't have to go far to figure out if your bead is long enough. Or too long. (It's surprising how well a Sharpie on graphite lasts and holds up to the abuse of torching.)


I was just winging it with this one - not sure if the length is right - and it certainly isn't fancy enough for me to put on a letter opener. (No dichro, for one!)


I highly recommend the article in conjunction with the tool. If they were smart - they would include a copy of the article with every one of these that they sell!

Friday, October 01, 2010

Groovy Masher


Not sure what this masher is called, but in the spirit of the Groovy Marver (you know - the one with the ridges that you roll your bead on) - Groovy Masher pretty much tells you what it is.

It's a masher with grooves.

It's fairly narrow, the mashing surface being 19 x 35 mm, that'd be 0.75 x 1.4 inches, for the metric impaired. But not everyone makes beads that are the size of school buses, so I think it would be fine for most people.


It strikes me as something of a one-trick pony, however. I mean, and I love tools, don't get me wrong - it's not like the single purpose tool doesn't have a place in my heart, but really - how many beads with ridges do you want?


Nice sharp lines - I have to admit - the example above is after firepolishing. If you don't have an obsessive need to firepolish, you will have sharper ridges than this.

Ok, there is something else you can do with it. There are these.


Make a gather, get it nice and hot - mash, and pull out with the rod as you mash - away from the masher, so you get a teardrop shape with vertical lines.

Then - with the mashed gather still attached to the rod, but by a thin, pulled out piece of glass - heat the rounded end, and a mandrel. Soften the end and wind around the mandrel, far enough to connect back onto itself.

Separate from the rod and kiln it.

Ok - so it's a two-trick pony.

And it occurs to me that you might get something interesting by mashing, and encasing the ridges, a la the whole Micheal Barley baleen look - which, while done with a blade, one ridge at a time, and much deeper than this will go, you might come up with an interesting look anyway.

Or - you could mash a paddle, and stripe inside the ridges with stringer (much like using an optic mold), and pull ribbon cane for leaves.

Ok - it obviously has multiple uses. I stand corrected.

Don't you hate it when you lose an argument to yourself? ;-)