Anyone who has read the Anne McCaffery DragonRider series will see the title "Shards" as a curse - the exclamation used in the book to express annoyance - and based on broken dragon egg "shards." But those of us in the glass world know that shards are thin pieces of blown glass, deliberately made and broken to use as decoration on other glass items.
How you use it is up to you. Personally - I recommend both for maximum ambiguity and confusion. ;-) "Shards - I broke another blown glass ball!"
These shards came from one of my students, who is starting a business to sell shards, twisties, cane, etc. She'll be launching her website shortly - when she does, I'll put up the URL. In the meantime, here's a sneak peek at some of those shards.
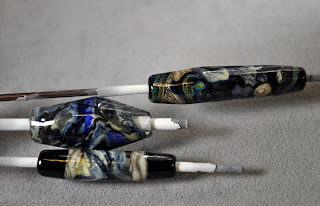
 This particular unnamed colourway (I think I suggested "Elvish Thunder") is dominated by blues and blacks. Using shards gives you a wonderfully organic look.
This one below is shards on a clear base. In some places, I have left the clear visible.

In this one, the centre is clear, with the shards added and melted in, and black ends added. A strip of silvered ivory stringer separates the shards from the black and gives a nice, clean edge.

This long bead is a black base, with shards and a few curliques of silvered ivory stringer, and some random stringer from my workbench - with what appears to be one of the high silver content glasses.

Shards are fun to play with - you easily get a very organic, swirly look. To use, make your base bead first, then pick up the piece of shard that you want to use with tweezers, and gently warm in the flame. If you can pre-warm them on top of the kiln or just under your torch, that is better, as you will get some breakage from the thicker pieces. (I find that a brick, right under the flame of my torch, with the graphite pad on top, gets considerable heat from the torch and does a pretty good job of warming or keeping stuff warm.)
Heat the surface of the bead to glowing, and stick the shard down from one edge or corner, and then heat to soften and wrap around the bead, using the tweezers to guide it into place. Heat and marver in flat, or leave dimensional for a different look. Continue to add in the same way, or not if you prefer the look of the one piece.
You can use them as the main part of the design, or as a launching pad for other ideas, as a background for florals or other decorations.
Because the glass is blown thin - the very dark colours really shine here, as do the reactives, and opaques take on a milky, translucent aspect - which I like very much!
All kinds of fun!
Hello! Just bloghopping. Great blog!
ReplyDeleteHappy blogging! :)