Sunday, August 10, 2014

CiM 613 Gypsy

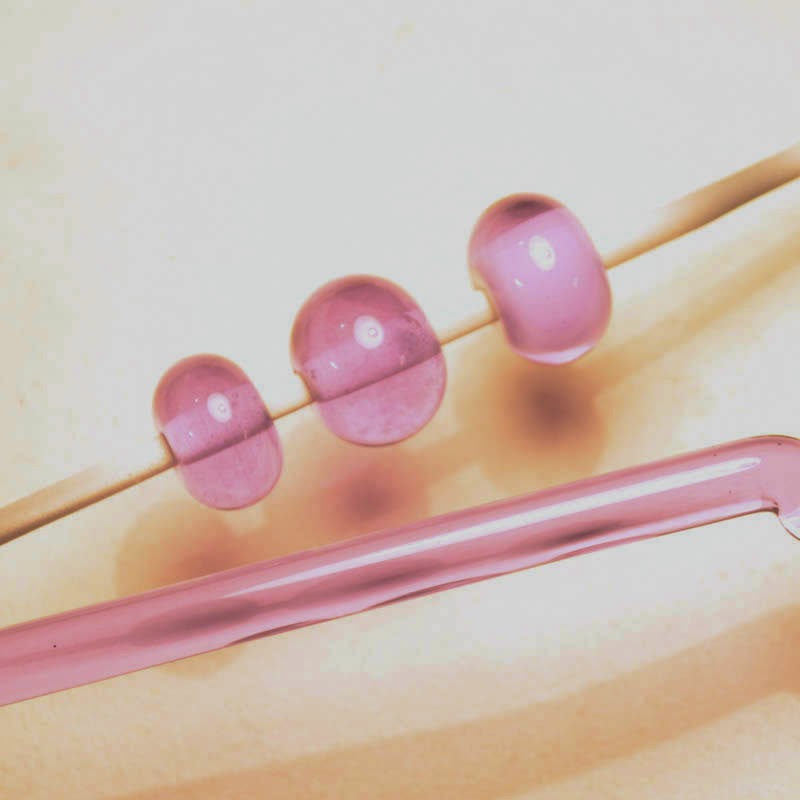
CiM's Gypsy is a dark, dark transparent purple, so dark, in fact, that the rod just looks black. And a bead made with it and nothing else also looks black. (Left-most bead)

But a dot on white reveals it's red-purple berry-juice nature, and the third bead from the left, Gypsy over clear, also shows it's wine-like nature.

Use as dots, in stringer, over clear, whereever you need a deep, intense colour that can stand to be diluted a lot.

Same three beads - strongly back lit.

Friday, August 08, 2014

CiM 614 Jellyfish (Colour Shift)

Meet CiM Jellyfish - a colour shift glass like the colour in commercial beads known as "Alexandrite" - and like the Effetre 081 Dark Lavender.

 This colour of glass looks blue in cool, fluorescent light, and mauve in warm light, like incandescent or sunlight.

This series of photos show the rather remarkable range of colours you will get as you move from one kind of lighting to another.

Pictured to the right, two self coloured beads and Jellyfish encased over white. 


 Quite remarkable, isn't it?

It can be something of a challenge to create with this glass, as you have to coordinate your colours for all types of lighting.

That said - I find it a really nice glass to work. Try it over silver foil sometime.
 This is Jellyfish over EDP (2 on the left) and EDP unencased.

 Those encased EDP beads again.

 Again, the EDP.
Colours that we see are caused by light of specific wavelengths being reflected from the object for us to see. This particular colour reflects light in some very narrow ranges of frequencies. As you move from warm light - with lots of orange in it, to cool light (more blue), there is less of the warm colours available to be reflected, and so the colour of the glass appears to "shift."

It's a neat piece of chemistry.

Wednesday, August 06, 2014

Effetre 420: Coral - Firecracker

Effetre 420 Coral - Firecracker variant.

Maybe someday I will understand why this colour - 420 - Coral - comes out different every time.

I am pleased to see that the sellers are giving it a subname - Firecracker - essentially labeling it as a batch. Because it's deeply annoying to fall in love with a colour, and then not be able to re-order it because - well - there is no way to talk about it. I mean, this is why we have Latin names for plants and things - so we can be certain we are talking about the same thing.


I doubt that this is THAT specific - but it's a step in the right direction. So if an orangey variation of coral that is super streaky and has almost an oriental carpet vibe to it is your cuppa tea - ask for Effetre 420 Coral - Firecracker. 
All four of the beads shown here are self-coloured - no other glass used. So you can see - it is really streaky.

Conversely, if you want a plain, even colour - this is not your glass. ;-)

Sunday, August 03, 2014

Goldstone stringer

 Goldstone stringer.

Here's the case for making your own, versus buying it premade.

Encasing with a colour.

These beads are a base of red, with goldstone stringer handmade with transparent red and clear stripes.

What a handsome effect, yes?


Saturday, July 12, 2014

Bead Recipe: Tidal Pools

I've always wanted to write a "Bead of the Month" column, but the reality is, I just couldn't jam another commitment into my schedule!

However, if I were to write a "Bead of the Month" column - this might be one of them.

I call this design "Tidal Pools" for the sandy texture and the rich blue pools.

Skill Level: Intrepid Beginner to Intermediate. The shape is unimportant, and can be asymmetrical and organic - good for beginners struggling with shape control.

Prerequisite: Know what a reduction flame is. Know how to make a twistie.


You will need

Glass Rods:
Effetre Light Ivory

Effetre Light Dark Sky Blue
Clear

Additional Supplies:
Goldstone frit, fairly small/fine
Silver foil
Some Twisties containing High Silver colours

Tools:
Your favorite marver
Pair of mashers
Plus all the usual equipment to make beads (Mandrels, torch, kiln, glasses). I am presuming you already know how to make beads and know how to make them safely.


 I usually have left over twisties laying around - but if you don't and need to make some fresh - make some using high silver colours, such as Double Helix and TAG. You might alternate stripes of ivory and Terra, or Helios or Clio or Aura. (Avoid the black looking rods - or not, but the look will be quite different.)
Before turning on your torch, tear or cut your silver foil sheet in half or thirds. 

Start by making a base bead in ivory, make it longish, anywhere from 1 - 2 inches, as per your preferences and ability.

Build it up and shape it into a rough oval, footballish shape. The shape isn't too important to the bead, and you can go for an organic shape that will suit this better than an example of perfect Euclidean geometry.

Let it cool and stiffen a little, and apply silver foil to the right half of the bead. (Reverse for left handed flame workers.) Burnish it onto the glass (rub with the marver.)

Apply the flame to the foil and melt it in. While it is still hot and glowing, roll the side you just applied foil to in the gold stone frit. It's not necessary to apply it all the way up to the very edge of where the foil was - leave a buffer zone.

Apply your twistie to the edge, more or less, between the foiled and unfoiled half. Again, this doesn't need to be precise.

Melt the twistie in.

Add two or three large dots of the Light Dark sky blue, one on the unfoiled end of the bead, next to the twistie, and the other on the other side of the twistie, on the opposite side of the bead.

Melt these in partially - flattening them with a marver, but leaving them still raised.

Apply a large dollop of clear directly onto the Light Sky Blue, and marver to the edge of the dot. Then continue to melt them in.

Once the dots are melted in, get the bead evenly heated and ready to mash. If a nice piece of pattern has developed that you can see, you may wish to feature this on the front of the bead, but as a general rule, choose to mash so that the Light Sky Blue dots come out on the sides, not smack in the middle of the front and back.

Mash the bead, tweak the shape if necessary, and firepolish out the chill marks. Turn the flame down to a reducing flame and reduce to bring up the metallics in the twistie. Kiln and anneal as usual.

Notes.

The layer of clear is what keeps the Light Dark Sky Blue bright - without it, it will reduce and react.


Correction: Dark Sky Blue.

The clear makes the blue look lighter, hence my memory error. Light Sky Blue comes out too light.

Wednesday, June 25, 2014

I'm not dead.

I know, I'm sorry - I went from regular posts to - Kablooie. Nothing. Sorry about that.

I've been occupied the last month with a lot of dog stuff, and just falling down exhausted at the end of the day. And there's another week of it to come too.

Hopefully - then I can resume some of the backlog.

I've barely been on the torch - I feel rusty when I sit down. How the heck does this work again?

Anyway - I did get in a few hours the other night. This flame headed dude emerged at the end of the evening.


Cheers all!


Saturday, May 24, 2014

Ruben's Tube - Visualize this ...

Ok - this isn't glass - but - damn - this is cool. It IS fire - so it's close enough. This is a method of visualizing sounds using flames. Sort of a fire-based oscilloscope.


Anybody want to build one with 2500 old Minor Burners? ;-)

Thursday, May 22, 2014

Drilling Glass

Here is an excellent, short video about drilling glass. It is specific to "sea glass" - but the principle is the same. If you have been experimenting with fusing, or off mandrel work, and would like to drill a hole - this is how.

The phrase "let the drill do the drilling" is really important - let the drill do the work, instead of leaning on it and trying to force the drill through.

You could make your own "sea glass" by melting up chunks of scrap glass, and then annealing them, and then etching, sandblasting, or tumbling them. There is an entire community of people out there who would consider that statement to be blasphemy,  but "sea glass" is broken glass bottles tumbled in salt water and sand. Mostly beer and wine bottles, fallen off boats. Hence the mostly clear, brown and green. Some blue - vodka, and the occasional red piece, a broken port running light.

Tuesday, May 20, 2014

Prince Rupert's Drops again.

I've talked about Prince Rupert's Drops before, but it's just soooo cool - here they are again investigated by Smarter Every Day.


Interestingly - he gets a speed of 1.03 miles per second which is 3708 miles per hour, vs CMOG which gets a speed of about 4,200 miles per hour.

Still ridiculously fast. 

Sunday, May 18, 2014

CiM 509 Poseidon Revisited

Poseidon, or Poseidan, as I keep misspelling it, so if I throw that in there, I'll find it next time I search - anyway - CiM Poseidon is a translucent sky blue that I reviewed a while back. It is a lovely colour, and I'm not clear why I didn't buy a bunch of it then. Probably something to do with having enough glass to start a small store, but that's another story.

I had heard that there seemed to be a colour difference between the old batch of Poseidon and the new, so armed with a rod of the old and a rod of the new, I sat down to test this out. Visually - the rods seem pretty similar, the older rod "O" on the top (fatter rod) and the newer on the bottom - "N." Held up to the light - the older rod is denser, but doh, it's thicker.


But when worked up into a bead - the older rod, on the left, actually does come out slightly more opaque.
 However, this might just be a function of heating and cooling, as all three of these below were made with the old batch, and match the right bead above.

From the left, base of Poseidon with ivory dots, and two self-coloured beads.

So - in conclusion - pretty colour - and the old and the new are functionally the same (as to be expected from CiM.) Slight variations probably come from technique. That's why we call it art. ;-)

Friday, May 16, 2014

Torture Test

Here, I was doing some torture testing - pushing the envelope with the Uroboros clear.

This is a base of that purple maybe-Lauscha, rolled in palladium leaf, encased in Riley Dichro Green/Magenta, and encased in Uroboros clear. Mashed, impressed, a couple of lines of intense black laid down, decided I didn't like them and pulled them off, poked, prodded, smeared, crunched, pulled, twisted, and just generally abused.

 While the bead looks like something that you find floating in the ocean after a big storm, a jellyfish in a sweater maybe, but the glass came through with flying colours. I'm impressed. That's a real world application for the Uroboros clear.

Wednesday, May 14, 2014

Riley Designs Dichro: Aurora - Green/Magenta Blue

I usually just plunge into the dichro and use it, and forget to mark what I was using, so I don't often review dichro.

This is from Riley Designs, it is a CBS coating (the dichro part) and a significant part of the Riley dichro line is coated onto Uroboros clear, for it's clarity. You have to admit, coating dichro onto Effetre scummy clear just seems like a bad idea.

This is a double layer of the dichro, and encased in Uroboros clear. It's very hard to get a clear dichro bead in focus properly - I should have done a manual focus - because - dichro is designed to reflect light, and does it in such a way that it makes it hard for the autofocus to figure out where it is.

Notice you can see the green and the magenta from it's name. Also some blue, gold and yellow, because dichro just doesn't stop at a few colours! (I should have shot the glass before using it. Dichro doesn't hang around long in my studio.)

Here we have a core of some lovely deep purple that I am completely uncertain as to the provenance of, but it might have been a Lauscha glass, with a layer of dichro, and encased in Uroboros clear.  

How freaking yummy is that? Never met a dichro I didn't like.

Monday, May 12, 2014

CiM 210 Sunset

Another orange from CiM - not too far in hue from Orange Crush, but it is an true opaque, and thereby doesn't have the same luminous quality to it.


Here we have two self-coloured beads - not much going on in streakiness. Nice, solid orange.

 And here we have, from the left, base of Sunset, Ivory dots, and on the right, base of sunset, turquoise dots. No significant reaction between the ivory and the orange, and the turquoise - that has developed a heavy, dull, leaden look to it - which sometimes happens with ivory. That should come off with soaking in CLR.

Nice orange. I like the Orange Crush better, but I like the transparency factor. But sometimes, you need an opaque!

Saturday, May 10, 2014

CiM 211 Orange Crush

Wowsers.

If you crush on orange - then this is your colour! This is CiM Orange Crush, a translucent/ transparent/ opaque striking orange.

Once upon a time, waaaaay back when, when I first started lampworking - I used to love Effetre's striking orange. It came as orange rods, and etched beautifully. I used to make goldfish goddesses with it.  I loved that glass. And then, one day, I bought some and it was different. It was a pale amber rod with a thin thread of colour through the centre, you HAD to strike it, and it wasn't really orange any more. More like red. Actually - a nicer red than Effetre Striking Red.

Sigh.

But now we have ... Orange Crush! Orange you glad?

This glass comes as a semi-opaque in the rod, and if you don't cook it, will stay that way - as in the bead on the left. The bead on the right - I heated to white-hot, and kilned it without striking it. It is much closer to transparent. Fun! These beads are both self-coloured.


However, thinking of those goldfish, all those years ago, I thought it might be fun to try one again. I worked off the end of the mandrel - thinking it could be hung as a pendant with a glue in bail.

It came out  pretty cool, and the tail is nicely flamboyant without the mandrel sticking out of his butt and getting in the way.


Here he is again, strongly backlit. You can see that the body - with lots of re-heating, has struck to translucent, while the fins, that get just enough heat to prevent them cracking, stayed largely transparent. 

 However, when I put him in the kiln, I put him on a rack, instead of flat on the kiln floor. And he bent. He went in flat, but drooped over the bead rack. It's actually a nice fishy wiggle-in-the-water kind of bend - probably better than if I had tried to do it - but as a pendant - that ain't gonna work. So this might be a little softer than most transparents, more like an opaque glass.


However - this is the ultimate happy orange and I'm glad to be able to add it to my palette again. Only took 14 years.

Thursday, May 08, 2014

Silver Reactions

Just another test of silver reactions.

This is a base of Effetre clear. Encased in Double Helix Pysche, reduced, and then encased again on the left with CiM Flax, and on the right with Uroboros Clear.

Pretty cool range of colours, eh? The Flax has reacted with the silver in the Psyche and gone deep Root beer. The Uro clear has created an iridescence of blue and green over the Psyche.

Very cool.

Tuesday, May 06, 2014

Uroboros 104 Clear

Uroroboros - I know them principally for their System 98 glass - 98 CoE.

However, they also make a 104 CoE clear.

So - let's give it a whirl.

Wow. This might be my new favorite clear.

I did nothing to the rods before using - just wiped off with windex and a paper towel. These came out pretty nice! 

 It is a very soft - almost soupy - clear - not a stiff clear. However - for encasing 3D stuff - a nice sloppy clear is great - gets into placed better.

This is a base of Uroboros clear, rolled in silver foil, and encased. You can see I got a bit of yellow/gold from being a little hot, but over all, I manage to keep the silver largely, silver.

With the Effetre clear, I might as well be using gold foil - it will all change colour.


For sure, more experimenting is in order, and I do still love Zephyr - but this is one sexy clear glass!


Sunday, May 04, 2014

CiM 715 Flax

CiM Flax is a pale, transparent, golden yellow champagne colour.

 Here are three self-coloured beads in Flax.

 And because the grey background was a little confusing, here there are again with a light cream background.
 This glass looked as scummy as all h3ll going on, rich, thick bubbly layer of scum on the surface - but it all smoothed away without any input from me, and made a nice clear bead - some little air bubbles, but the scum disappeared!
 This is over Palladium. Base of black, palladium, encased in flax. This was an oops, actually. I was going to try it over silver, and pulled out the wrong metal, and didn't figure it out until too late. Not like you can get palladium leaf back into the booklet anyhoo. That should have clued me in, it was too thin to be the silver I get - but I had forgotten I had any of this. The advantage to using palladium foil is that you won't burn it off or melt it in or have it disappear like silver.
 OK - try again. This is a base of Flax, a layer of silver foil, encase without letting the silver foil melt.


You can see that the Flax has reacted with the silver to make a beautiful, rich rootbeer / topaz colour. The monster air bubble stayed silver (so the reaction only happens where the flax touches the silver, and at the top, right, of the bead, it where I accidentally hit the silver with the flame before encasing and melted the silver in. Still looks pretty cool.

Flax - super-reactive with silver.


Friday, May 02, 2014

CiM 812 Jupiter Storm

I have to admit, I had already seen a preview of what Jupiter Storm can do over on the Creation is Messy website - so I wasn't really surprised by the colour change in this glass.

From the left, we have two self-coloured beads of Jupiter Storm, both cooled and struck, one with turquoise dots (a little reaction at the edges of the dots) and one self-coloured bead, unstruck on the far right. 

 This is the rod - you can see some of the range of colours that you can get out of this glass.
 And here, again, with the second bead from the left, you can see it developed a lot more colour where the flame warmed it, and on the sides, where it stays cooler, it has stayed more of a taupe colour.
I can see that I also cracked that first bead. I heard it go, and re-heated it, but obviously - didn't get it hot enough.

You can see by the difference between the beads on the left and the far right, that this glass does NOT self-strike in the kiln. If you want the colour - you are going to have to strike it yourself. Let it cool to "not glowing," and then re-introduce it into the flame to get the strike.

Looks like this one will be lots of fun, lots of variation in it!

Wednesday, April 30, 2014

More stamps. Metal Stamps from ImpressArt

OK, so now I have the stamping bug.

Got my hands on some steel stamps made by ImpressArt - which I got from BeadFX. These stamps aren't designed to be used for glass, but are made for metal and can be used with metal clay, polymer clay (before firing/baking) or even with leather.

I've used metal stamps (stamps designed for metal) before for glass, with good results, so I thought I should give these a try too.

First up - hey a paw print! This is 6 mm, about the same size as the smaller Leonardo pawprint, (see last post), but is raised, so it makes an imprinted (concave) impression. It is a little more generic, almost cartoony - but it works just fine, thank you. I prefer the Leonard ones, but that's because I'm picky about the shape of the paw.


 Next up - well - who did you think was leaving those paw prints? This is labeled a German Shepherd - although I say it looks more like a Belgian Tervuren. It's pretty cool, if very, very specialized. Could be a signature stamp - if you had called yourself "The Bead Herder," "Fetching with Fire," or "Barking Beads."
 And this one is a stylized flame. Which is just pretty freaking cool. And soooo appropriate for just about any of us ... .

Keep the tool out of the flame, soften the glass where you want to make the impression, put the bead down onto a surface that you can push on (i.e. a torch top marver is perfect), and firepolish very gently after - you don't want to soften the detail. Don't linger on the hot glass - you don't want the stamp to get hot and stick.

 Because these are made of steel and intended to be hammered, they do not have a wooden handle, so I would caution you to remember, they have the potential to get really, freakin' hot. Pick 'em up with pliers, wrap some leather around the end, or just do whatever it takes to not hurt yourself.