CiM Prairie Grass is an opaque, light green that is just slightly less yellowish than Effetre's 212 Pea Green. The saturation and shade is almost identical, but the hue is slightly different.
It is slightly streaky.
If you like pea green, you will probably enjoy this. If you are making subtle colour transitions, you may find this very useful.
CiM reports that this was created to be a response to the now unavailable Vetro Parrot Green. I believe that Parrot Green was a more vibrant colour though.
A nice spring, leafy green.
Pages
▼
Sunday, October 30, 2016
Friday, October 28, 2016
CiM 625 Bashful
CiM Bashful appears to be a light, transparent grey - but with its 600 series number, we find that CiM considers it to be in the purple family.
It does appear to be a slightly different colour as a worked/annealed glass than as an unworked rod.
I also had a tendency to air bubbles. Just couldn't get away from the tiny swirls of very small bubbles.
Overall - I find it quite pretty - I'm not, as you may have noticed, a grey person at all - and while I don't really see any purple in this, I do think that a very pleasing shade of light grey.
Wednesday, October 26, 2016
CiM 441 Dragon
CiM Dragon - CiM - CiM calls this an "opaque green laden with silver" - which seems to make it the reverse of CiM's Class M Planet. Hmm - a class M planet with dragons. Sign me up.
As it cools, it turns opaque light blue, and then continues to cool back to green.
Overall - it is primarily green with some blue streakiness and some potential purpliness.
Note the colours that develop on the rod from heating.
Interesting, eh?
Headpins. Green.
On an ivory base - no grey line - but some interesting reaction/separation occurring.
Leaves. Quite a bit of colour variation from the heating, rapid cooling, firepolishing.
And check it out - some purplish stuff happening.
Quite a bit of colour variation on this flame, places that get more heat are lighter in colour.
Lots of interesting potential with this one. I look forward to playing with this one and Class M Planet too.
Monday, October 24, 2016
CiM 822 Mockingbird
CiM Mockingbird - a transparent grey of medium to dark density.
It's grey. It's hard for me to get excited about grey. Other tester's report that it colour shifts, becoming bluer in some lights.
Whatever.
It's a nice, well-behaved transparent grey. Maybe layer it over silver foil and see what you get.
Headpin, backlit.
Sidelit.
Flames.
and backlit.
Strong sidelight.
Grey. Meh.
Saturday, October 22, 2016
EDP
EDP - Effetre's infamous 254 - Orchid Purple. Evil Devitrifying Purple. EDP. Just a reminder that it is, in fact, a beautiful colour.
That is all.
That is all.
Friday, October 21, 2016
CiM 312 Yellow Brick Road
CiM Yellow Brick Road is a soft, light palamino colour, that reminds me a lot of the colour reactions and variations that Effetre Opal Yellow and CiM Stone Ground are known for.
You can see the colour variations that you can get in the end of the heated rod.
It goes white as it cools, and then continues to turn back to yellow.
The two round headpins are pretty evenly coloured, but the flattened one on the right shows a rosy blush from the rapid cooling and re-heating to firepolish.
Pretty evenly coloured, a bit of rosy blush along the leading edge, where it gets a bit more heat.
With turquoise dots. Not a grey line per se, but a reaction of some sort. This wasn't really visible when it went into the kiln, either.
And EDP dots. Looking very much like Eff. Opal Yellow at this point.
Make a palomino pony with this, or try silver foil and then EDP and Turq dots.
Wednesday, October 19, 2016
CiM 121 Garnet
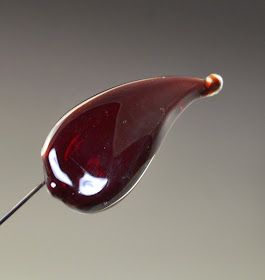
CiM Garnet - a very, very rich dark red. I, frankly, had some problems with this one - although I see from the CiM site that it might well have been from not heating it enough to start. Ha - me working too cool, who would have thunk it?
In all fairness - I made no effort to strike this, as red generally strikes as you work it, and I often like the slightly unstruck fire opal orange edges.
However - this glass seems to develop a greyish streakiness that does not go away by itself.
First off - the rod. This is a very dark, very dense red. Garnet usually is.
This looks quite orangey - but is strongly side-lit. You can definitely see where it has developed colour unevenly though.
Same piece, backlit.
and just regular light.
This one, I encased. It had grey streaks when I encased it, and they did not go away. I expected them too.
Maybe I'm being overly picky, it is definitely red - but not a sparkling juicy red.
Very strong side-light.
And again, on the other side. Maybe you can actually plan for this and use it to good advantage.
Two curly doo-dads - (I am currently taking a break from bead-cleaning) - encased in clear - three different lightings. If nothing else - this shows you what a difference the light can make.
And the same three approaches to some leafy bits.
And a banner. Here - where the glass is thin - it really shines as a colour.
And this one I rather like. Again - thin enough to really show the colour.
Unfortunately - you can see some cracking in the glass around the wire.
Still - I like this piece.
Garnet - I would suggest trying the heat-to-clear approach with this, and make a point of striking it instead of leaving it to strike in the kiln or just as you work it. It's very dark and may be daunting to the beginner.
Round 2
I decided that with that little stumpy end, I wanted to see what happened if I melted it clear - got it so hot that it went clear. And this is the lovely little jewel that resulted. I got it drippy hot, completely clear, wound off the bead, and watched it cool and go red before my eyes without striking. And popped it in the kiln. Beautiful!
And with the tiny bit I had left - you just can't get it that hot and put it on the wire - the wire won't handle that kind of heat - due to being that much thinner. I encased it, and pulled it - which cools it quite quickly. I got some grey streaks and this time - spent rather a lot of time trying to re-heat them and strike them out. Fortunately, that reduced them significantly - although I won't say they are completely gone.
Same leaf - stronger light.
And here is the leaf and the bead together. A very dramatic difference in colour.
Not sure what to make of all this. Definitely a glass that can challenge you. The spacer bead is gorgeous, in other applications - you are going to get different results.
However - this glass seems to develop a greyish streakiness that does not go away by itself.
First off - the rod. This is a very dark, very dense red. Garnet usually is.
This looks quite orangey - but is strongly side-lit. You can definitely see where it has developed colour unevenly though.
Same piece, backlit.
and just regular light.
This one, I encased. It had grey streaks when I encased it, and they did not go away. I expected them too.
Maybe I'm being overly picky, it is definitely red - but not a sparkling juicy red.
Very strong side-light.
And again, on the other side. Maybe you can actually plan for this and use it to good advantage.
Two curly doo-dads - (I am currently taking a break from bead-cleaning) - encased in clear - three different lightings. If nothing else - this shows you what a difference the light can make.
And the same three approaches to some leafy bits.
And a banner. Here - where the glass is thin - it really shines as a colour.
And this one I rather like. Again - thin enough to really show the colour.
Unfortunately - you can see some cracking in the glass around the wire.
Still - I like this piece.
Garnet - I would suggest trying the heat-to-clear approach with this, and make a point of striking it instead of leaving it to strike in the kiln or just as you work it. It's very dark and may be daunting to the beginner.
Round 2
I decided that with that little stumpy end, I wanted to see what happened if I melted it clear - got it so hot that it went clear. And this is the lovely little jewel that resulted. I got it drippy hot, completely clear, wound off the bead, and watched it cool and go red before my eyes without striking. And popped it in the kiln. Beautiful!
And with the tiny bit I had left - you just can't get it that hot and put it on the wire - the wire won't handle that kind of heat - due to being that much thinner. I encased it, and pulled it - which cools it quite quickly. I got some grey streaks and this time - spent rather a lot of time trying to re-heat them and strike them out. Fortunately, that reduced them significantly - although I won't say they are completely gone.
Same leaf - stronger light.
And here is the leaf and the bead together. A very dramatic difference in colour.
Not sure what to make of all this. Definitely a glass that can challenge you. The spacer bead is gorgeous, in other applications - you are going to get different results.