Pages
▼
Sunday, January 31, 2010
Shards!
Anyone who has read the Anne McCaffery DragonRider series will see the title "Shards" as a curse - the exclamation used in the book to express annoyance - and based on broken dragon egg "shards." But those of us in the glass world know that shards are thin pieces of blown glass, deliberately made and broken to use as decoration on other glass items.
How you use it is up to you. Personally - I recommend both for maximum ambiguity and confusion. ;-) "Shards - I broke another blown glass ball!"
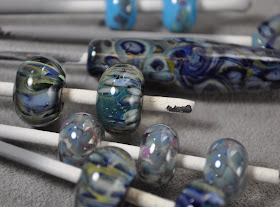
These shards came from one of my students, who is starting a business to sell shards, twisties, cane, etc. She'll be launching her website shortly - when she does, I'll put up the URL. In the meantime, here's a sneak peek at some of those shards.
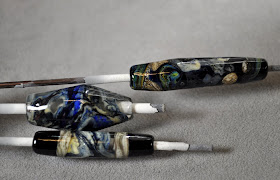
This particular unnamed colourway (I think I suggested "Elvish Thunder") is dominated by blues and blacks. Using shards gives you a wonderfully organic look.
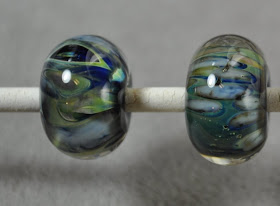
This one below is shards on a clear base. In some places, I have left the clear visible.
In this one, the centre is clear, with the shards added and melted in, and black ends added. A strip of silvered ivory stringer separates the shards from the black and gives a nice, clean edge.
This long bead is a black base, with shards and a few curliques of silvered ivory stringer, and some random stringer from my workbench - with what appears to be one of the high silver content glasses.
Shards are fun to play with - you easily get a very organic, swirly look. To use, make your base bead first, then pick up the piece of shard that you want to use with tweezers, and gently warm in the flame. If you can pre-warm them on top of the kiln or just under your torch, that is better, as you will get some breakage from the thicker pieces. (I find that a brick, right under the flame of my torch, with the graphite pad on top, gets considerable heat from the torch and does a pretty good job of warming or keeping stuff warm.)
Heat the surface of the bead to glowing, and stick the shard down from one edge or corner, and then heat to soften and wrap around the bead, using the tweezers to guide it into place. Heat and marver in flat, or leave dimensional for a different look. Continue to add in the same way, or not if you prefer the look of the one piece.
You can use them as the main part of the design, or as a launching pad for other ideas, as a background for florals or other decorations.
Because the glass is blown thin - the very dark colours really shine here, as do the reactives, and opaques take on a milky, translucent aspect - which I like very much!
All kinds of fun!
Tuesday, January 26, 2010
Interesting Mink
I like CiM 788 Mink for making ponies - it's a very nice brown, and quite unlike any other brown. I have blogged it before.
However - I got a very interesting reaction/effect/whathaveyou the other day. Notice the crackle effect on the horse.
I thought that the next one I made didn't have the same pattern - see second photo, but I see now, that with the magnification that the photo affords me - that I did get it a little.
The first one is on white base, and the second is on ivory.
Not sure what happened. I may have inadvertently been working in a slight reduction flame - or perhaps there was a contaminant on the glass. Whatever it is - it's a pretty cool effect.
So - now I have to figure out what's causing it.
Cool, eh?
Saturday, January 23, 2010
Your Word for the Day: De-wonkify
And your vocabulary builder for the day is:
De-wonkify. The acting of salvaging a bead that has gotten off-centre, and/or off-round. "I'll be with you as soon as I finish de-wonkifying this bead."
;-)
De-wonkify. The acting of salvaging a bead that has gotten off-centre, and/or off-round. "I'll be with you as soon as I finish de-wonkifying this bead."
;-)
Tuesday, January 19, 2010
Val Cox Frit: Flamingo Dancer
Yet another burst of pinkness - this one seems a bit more intense - possibly because of having some opaques.
The working notes say:
Blend - Opaque/TransparentI tell ya - having these notes with the frit, as in the sample packs - is just one of the best things about these frit blends. Being armed with this knowledge can save you oodles of frustration.
... complex mix of several gold-pink and salmon tones ... . When silver foil is incorporated, yellow gold tones emerge. ... can be fussy - and prone to devitrification ... don't expose to frequent heating and coooling ... .
So - devits - we'll stick to designs that don't require heating and cooling and heating.
First up - a simple clear spacer, rolled in frit. Did not go back in the flame after melting in the frit.
Next up - same idea, on white.
Now, let's test this silver foil idea. White bead, roll in silver, melt in, add frit, mash. Love the way the silver bead up and pops up between the frit.
Next, same again, but encased. White bead, roll in foil, melt in, frit, clear, melt down. Kinds looks like a half-eaten mango.
All righty then - let's go crazy. Do you really want to know all the steps for this? You do? OK ...
- Periwinkle base bead
- CiM Lapis and Double Helix Triton lines
- Silver foil, melt in
- frit
- encase
- add ends in Triton
- mash
- push ridges into the glass
- encase it again, filling in the ridges, but hoping to retain the look of texture. Sorta worked.
- Add wings - which are clear and triton
- Mash wings, for shape and ruffles
- Dots - Triton
- Reduce.
I didn't have any trouble with this frit - but knowing that there are gold-pinks in it, subject to de-vitrifying, I significantly changed the way I worked on this.
Quite a nice blend - and I think I can respect it better for being a bit of a challenge. Which is not to say that I don't enjoy the pushover blends too!
Thursday, January 14, 2010
Val Cox Frit: Groovy Swirl
Hey - another frit that I don't hate! I might be getting better at this! This one is called Groovy Swirl, and the working notes from the packaging say:
Blend, Opaque.
... collection of silky blue, aqua and subdued lime and violet ... classic, easy to use ... paired with silver foil, produce(s) mosaic patterns.
Aha - the key words - "paired with silver foil."
But first - lets just make some clear spacers and roll them in the frit. Much more subtle than I expected, nothing flashy, but perfectly functional.
Next up - frit, silver saturated glass (Triton, I believe, or Nyx), and frit, encase, and melt down, distorting the frit.
D4mn, that looks fiiine! Let's try that again! This time, I hit the frit with a reduction flame, then quickly encased it.
Wow - even better. Let's make another of these!
Ok, totally digging this! These two are just on opaque turquoise (Lauscha). Meh. Not going to reduce this one!
Back to the silver saturated glass. This was Double Helix Triton (I have it labeled Triton ?. There was some confusion in my studio as to exactly what it was - but for sure it is a high silver content Double Helix colour), rolled in frit, mashed, hit with a reduction flame (large reduction flame), and selectively unreduced, in the centre, where the blues dominate. To do this, turn your oxygen back up, and just briefly hit that part of the bead where you want to take off the reduction effect. Just wash the flame over it and be done.
And finally, same thing, but with a long, shaped bead. Except I swirled the frit pattern a bit so it would be less stark and "fritty." I couldn't decide which side I liked better, so you get both.
I might actually buy a whole jar of this one! Me like!
Saturday, January 09, 2010
Implosions
A student asked me about implosions, and my response was - "Actually, I suck at them." But - nothing like a challenge - so I've been working on them.
Frit. The secret is frit. Mash out a maria, plonk it down on a bed of frit, melt it in. D4mn. These are going way better than I thought they would.
So there you go. Another good use for frit. ;-)
These are Winter Blue or Lipstick Pink Val Cox Frit. 'Cept the one in the middle - which is both.
Frit. The secret is frit. Mash out a maria, plonk it down on a bed of frit, melt it in. D4mn. These are going way better than I thought they would.
So there you go. Another good use for frit. ;-)
These are Winter Blue or Lipstick Pink Val Cox Frit. 'Cept the one in the middle - which is both.
Thursday, January 07, 2010
New Camera
Those of you who follow me over on The Beadful Life know that I just got a new camera. I'm still trying to figure out all the bells and whistles. I haven't really mastered all the settings - heck - I think launching the space shuttle would be easier. However, by hook or by crook, I'll get it figured out.
In the meantime - is this not just totally juicy! You'll probably want to experience this one at full resolution.
Wednesday, January 06, 2010
Val Cox Frit: Pink Lipstick
I'm not a pink person - no one who has ever met me would characterize me as a "girly girl" - thank heavens. But I use a lot of pink glass because, well - it sells, and because I enjoy the challenge.
And this Pink Lipstick frit is actually pretty no-fuss. You can get your pink fix without killing yourself with this one.
The working notes say:
On the left, white, rolled in clear, and on the right, a gather of clear, dipped in frit and wound.
Another rolled in frit, on CiM Crocus.
And white, rolled in silver foil, melted in, and then rolled in frit.
I enjoyed using this frit - it's very pretty, and I think makes beads which are eminently sale-able. A real no-brainer.
And this Pink Lipstick frit is actually pretty no-fuss. You can get your pink fix without killing yourself with this one.
The working notes say:
Blend - Opaque/TransparentThis pair are clear, rolled in frit, and melted in.
... a no fuss blend that pairs perfectly with silver foil to reveal gold tones. Work in a neutral flame on non-reactive base glass such as white or clear.
On the left, white, rolled in clear, and on the right, a gather of clear, dipped in frit and wound.
Another rolled in frit, on CiM Crocus.
And white, rolled in silver foil, melted in, and then rolled in frit.
I enjoyed using this frit - it's very pretty, and I think makes beads which are eminently sale-able. A real no-brainer.
Monday, January 04, 2010
A Shout Out to Lampworkers
The community of lampworkers/flameworkers/torchworkers - call us what you will - is small, but closely knit. We need to be - an artist's life is a perpetual gamble against extremely long odds.
In this case - Michelle Goldstein.
Read this post - and see if you can do anything to help.
In this case - Michelle Goldstein.
Read this post - and see if you can do anything to help.
Saturday, January 02, 2010
Val Cox Frit: Fairy Dust
Fairy Dust - a soft, blue green blend. Working notes say:
Fairy Dust blend/opaque
... hushed and delicate shades of soft blue, aqua and warm green (sic) ... no fuss blend. Work effortlessly with nearly any base color, with or without silver, neutral flame.
And that pretty much sums it up. Not a lot of drama - just a quite blend of aquas.
First pic - bead on the right rolled in frit, bead on the left, gather dipped and wound.
Second pic, triton base, frit, encase and distort.
Meh.