Pages

Saturday, March 28, 2009

Northstar - SPC414 Black Pearl

Northstar Glassworks - Black Pearl. This is one of the Northstar "exotic" 104 COE glasses.

The instructions for this say:

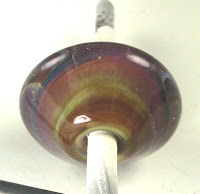
Simply reduce SPC414 Black Pearl to get amazing colors. A light reduction is all that is needed to get the colors to pop. Turn down your oxy a bit until you get a small, bushy flame. Pass the bead in and out until you get the colors you want. The colours pop almost immediately. Let it cool a bit and then go back to a neutral flame.
These did reduce very easily and quickly. I turned down the oxygen just a smidgen - not even enough to produce long, yellow candles, just a bushy, fatter flame with ragged candles. (Candles are those "fingers" of bright blue flame that come off the face of the torch.)

These next ones are ivory with trails of Black Pearl. I reduced them more and you can see they have gone to a more yellowy green - than the intense metallic look above.

And again, the lentil below was made with trails of Black Pearl, raked, and dots - poked, and reduced.

The effect is not so reflective - but the reaction with the ivory is quite striking. I should try an ivory + exotic twisty.

I was really pleased with the first two spacers. I think it might be very easy to over reduce this colour and wind up with a more hazy look. Reduce it with a "get in and get out again" approach. I actually didn't go back to a neutral flame after - I put them directly in the kiln - not sure if that makes a difference - as generally, with a reduction glass - that un-reduces it. Spose I should at least try it!


Monday, March 23, 2009

Update on TAG Black Cherry

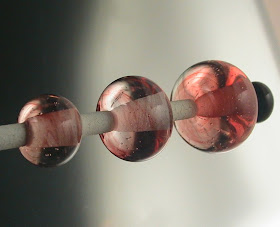
Ha - just as I suspected - another run through the kiln brought out more colour in these three beads. Interestingly - the smallest - the one that is just Black Cherry - came out the darkest.

I put these in the kiln cold, and just turned it on. It takes my kiln about 20 minutes to come up to 940. I haven't had any problems bringing annealed beads up to that temperature at that speed. (For that matter, if I have unannealed "demo" beads - that have cooled to room temp just sitting out on the rod rest - so people can see what they look like cooled down - I will throw those in the kiln before I start the next annealing cycle. If they survive that, which they do if they are small enough - they are good to go. If not - well - they were just demo beads anyway.)

Anyhoo - I turned the kiln on about 9 pm, and torched till midnight, and then set the kiln to ramp down. So these got about another 2.5 hours at 940, then another 8 hour ramp down.

These blushed up to a nice Black Cherry Red! (Compare to the last post.) Mmmm - black cherries. Black Cherry ice cream. mmmmmm.

Friday, March 20, 2009

TAG 104 - 06 Black Cherry

Trautman Art Glass - Black Cherry. This is a kiln-striking red - which means that it goes red in the kiln - after you make the bead. How red it goes - in the case of this particular glass - varies with how long you leave it in the kiln.

The working notes from the Trautman Art Glass site state:

This glass comes transparent, but kiln-strikes into a super-dark antique ruby red. Can be reduced. Work cool or heat your bead back to transparency at the end of your flame working time, to prevent it from getting "muddy."

(I haven't tried reducing it, yet. I also find no trace of muddiness - which is gratifying.)

Trust me - I didn't work this stuff cool. On the other hand - I didn't have to heat it back to clear, either - it just looked clear the entire time I worked it. But I didn't particularly super heat it either. I just made a gather and wound off a bead.

The first pic - the bead on the left is self-coloured (only Black Cherry - by the way - self-coloured is a term from my doggy life - meaning all one solid colour - in case that's been confusing you.) The middle bead had a clear core (I was worried about these getting to be too dark!) and the right hand bead is encased with clear. They are all pretty consistent for colour. The larger one is darker because it has more coloured glass.

Additional working notes for Black Cherry from TAG continue to explain that the colour deepens with the length of time spent in the kiln, and with higher temps too. They explain that in order to get the colour you want, do a test bead and put it in the kiln and garage it, and check it every 10 mins until you get the colour you want, and then run your annealing schedule. As the bead continues to strike duringing annealing - you may then want to adjust the garaging time - in order to have the bead come out exactly as you want it.

This, as they say, "gives the artist a great deal of control as to the exact colour" and they suggest making your Black Cherry beads at the end of your working session - and then adjusting your annealing schedule to get optimum colour.

The first set of beads I made, were, in fact - made at the end of my working session. I have my kiln continue to hold the temp at 950 for an hour after the last bead, and the entire ramp down takes about 8 hours after that, the way I have it programmed. As you can see - not so dark.

So, the next session - I made the beads earlier - and they got an additional 1.5 hours garaging at about 950. (I think my kiln actually runs a little hot - 945 is where I have it set - I think it's closer to 960 actually.)

You can see here - from the second session, Black Cherry encased in clear. This is a much nicer, richer colour. I would suggest making these at the beginning of your bead-making session - and that gives them lots of time to develop colour - but your milage may vary. It occurs to me that I might run the first beads through another annealing and see if I develop a nicer colour.

TAG also notes that this glass varies from batch to batch - so remember that when you re-purchase it - your striking time may change.

It's a really nice shade of red. Not being able to see the colour while working it is a little frustrating - and I'm not much for planning ahead in order to adjust my schedule to get the exact, specific shade.

But is it a really nice red. I'm on the fence on this one. Really nice colour versus waaaay too much thinking/planning about it.

Thursday, March 19, 2009

CiM 872 - Tuxedo


Another black from CiM - but this is a less expensive black - an equivalent to the Moretti and Vetro blacks - in that it will pull out to a purple, rather than staying black or going grey when stretched really thin - like the CiM Hades black.

The tab bead is a gravity wave bead (horizontal stripes on an opaque core - get it liquid hot, and rotate so that the stripes stretch out around the bead and the stripe colour gets thinned out.)

While it looked pure black and grey and white when it went into the kiln - it has stretched and thinned out to both purple and blue, interestingly enough.


It also does seem to have webbed a little bit.

A useful enough addition to the colour palette, especially if you are developing a loyalty to CiM - which certainly seems to be worth it!


Wednesday, March 18, 2009

Veiled Clear Rubino


Beautiful! Oh my! Must.buy.more.

A nice cranberry pink before going in the kiln (rod at top) - this strikes a little darker in the kiln (paddle below) - but also has wonderful swirly streaks!


A watery effect - like looking down through a rushing stream - this has beautiful visual texture! And it definitely strikes in the kiln - as this particular bead was very light in the centre when it went into the kiln - but came out a uniform, deep pink.


These are so pretty - they just speak for themselves - but I guess the next step will be to put them over white. Or a light pink! Or periwinkle!

Gorgeous!

Tuesday, March 17, 2009

The Rest of the set-up

Well - I've shown you the torch - I might as well show you the rest of the set up. ;-)

The torch (pre-installation of the marver) is front and centre. On either side, boards are clamped to the desk as elbow rests. (The plastic bag doesn't live there.)

There is a hot plate to the far right - which I admittedly use only as a place to put my MP3 player - which plugs into the surplus speakers - one is there on the desk - the white rectangular box. Lights illuminate the workspace, and give me quick access to bright light to better see colours in the hot glass.

To the left is the kiln - a Paragon - with the swing-up front door. I love this - the door is counter-balanced to swing up and out of the way easily, and to stay in whatever position it is placed. This kiln is big enough to take a 12 inch mandrel - which - by the way - I have now found is essential with this torch. You need more room to get away from the heat of the flame. A rod-end grabber is also a must with this torch. You just can't hold the glass as short and as close to this bigger flame.


Behind my torch - I have a block of "Oasis" type foam, that I store my dipped mandrels on. It sits on a giant lazy-susan, so I can rotate it to get to the size of mandrel that I need at any given moment. The lazy-susan is wood (Ikea) and I've only scorched the surface of it a couple of times by putting hot rods on it.


The concentrators - all three of them - lurk under the table. They are a 10 litre per minute on the left, and two (further back) 5 litre per minute concentrators.


This is my stash of glass - this is the official, sorted stash.


And this is the overflow - which I am scared to put on the shelf. I have another shelf that I should move into place to hold the rest of this glass, but it is about 2 inches too wide for the gap - so I would have to unload the first shelf to move it to make enough room. You can imagine my lack of enthusiasm for that project!


The floor is painted concrete. The "security officer" lying on the floor generally snoozes behind me while I work. He's in charge of scaring away burglars and making dust bunnies of truly staggering proportions. He's very good at both those activities. ;-) They don't call 'em German Shedders for nothing!

Monday, March 16, 2009

Adding a Torch Mounted Marver to the Mid-Range


One of the first things I noticed - no marver on my new torch. Ack! I can't live without my torch mounted marver - and, of course - the old one of my Mega doesn't fit. I carried that one forward from the Minor - but it doesn't go on the top mounted Mega on my mid-range - so I had to get the one designed for the torch.


Installation was easy enough - once I found the right screwdriver to take the screws off. Which was, actually - a significant challenge. (Neither my husband nor I have the "gene" for putting things back where they came from - so finding the right tools for the job is always a significant challenge in our household. We own it - we can't find it. Sometimes, it's easier to buy a new one than find the one we have. Then we have two. We have 5 hammers. )

The screws are hex-headed - so I had to go hunting for an Allen key to remove them. I finally found some in the garage. And they are in there pretty tight, too.


The bottom screw also attaches the torch to it's mount - so you have make sure you line it back up when installing the marver.


Insert the two screws (bolts, actually - they came with the marver), and screw them in.


It came with a couple of nuts, which I applied to the slightly protruding ends of the bolts on the other side.

That was it - good to go!

I'm happy!

Sunday, March 15, 2009

At Home on the Mid-Range


Sheesh! Talk about a tough crowd! It's not real if there's no pictures? (see comments re last post.)

OK - here's your proof. First up - the beads that I made on the first night.
The mandrel in front is a bunch of beads made with Double Helix Luna 2, and/or Double Helix Khaos. Sorry - can't tell you which is which. The cylinder bead I encased, and you can see in the close up that I burned the s--t out of the encasing - although, in fairness - it was a scuzzy piece of random, cr-ppy clear that was lying around on the desk. The pink spacers were a nice fat rod of laucha opaque pink, and the two in the back ground were also Luna 2, but made on the old torch, the Mega. There is definitely more colour in the bead made on the new torch - because, I believe - I could get the glass hotter and for longer. This glass was seriously dripping off the rod.


Next - the torch itself. Here you see it from the left, and from the right, against the general background clutter of my work area.

Note, there are only two hoses, but four valves. There is just one gas hose and one oxygen hose. As with the Minor and the Mega, the red knobs are for gas, and the silver knobs are for the oxygen. The graceful swoops of copper tubing carry the gas and oxygen forward to where they need to go.


It all could look a little overwhelming and intimidating - but if you've already being using a Minor or Mega - you can discount the controls for the top torch (which you already know how to use) - and just focus on the other set of controls - which work the same way.

(BTW - you don't have to get one with the top-mounted torch - that's an "optional extra.")


One thing I forgot to mention in my last post - when I fired the mid-range up for the first time - it smoked and bubbled at little at the seam here - where I'm pointing with my finger. A quick call confirmed that this is normal with this torch when it is new - and may go on for up to a couple of hours - but probably not extend to the second day. Little wisps of smoke continued to appear for about half an hour - and that was the end of it. This is the sealant between the torch face and body heating and is perfectly normal.


Here we are - looking at the business end of the torch - the front. (At this point - the torch looks different again because I have now installed a torch-mounted marver. I'll cover that in a separate post.)

The top torch is the Mega - with the red housing, and the bottom - in brass - is the Mid-range proper. Notice it is actually two groupings of jets - a centre fire and an outer ring.


Here's a view you won't see very often - looking up at the torch from in front! Here, I have turned on and lit the gas on the mid-range, but not added in the oxygen yet.


And the same view - with the oxygen turned on. Now, we have such an intense light that the poor camera can't cope, and all you see of the flame is intense while light.


Here we are, looking down, a bit to the side, and all the camera can register is that intense, white flame.

And here, the same angle - now I've adjusted the camera to show a more accurate representation of the flame, but the rest of the image disappears in darkness.

Now do you believe? ;-)

Friday, March 13, 2009

New Torch - Woohoo!

Yes - it's true. After spending that day at Nortel playing with a bigger torch - I found I couldn't go back. So I just stepped up to the Midrange!

The Nortel Midrange is the next torch up in their series from the Mega (for the record, it's
  1. Minor Burner (Smallest)
  2. Mega Minor
  3. Midrange
  4. Red Max
  5. Rocket (Most extreme)
not sure where the Major falls in that hierarchy.) The version that I got has a second torch mounted on top, in this case, a Mega. This is so you can work smaller and more detailed if you want.

The torch face is significantly larger - making for a flame that is just a heck of a lot bigger across - maybe 4 x the size - twice the width, twice the height. This really changes the way the glass heats - allowing you to heat a lot more glass at once. My first few attempts had me dripping glass all over the table. So naturally, I dragged out some Luna and Khaos - to see if heating the snot out of it was easier! And - it was. Whether I burned the snot out of it - remains to be seen on the morrow!

I have it hooked up to three concentrators - 1 ten litre, and 2 five litre oxygen concentrators. I did some math with the assistance of my significant other to determine that I was ok to run all three on one circuit. The total is about 1800 watts - and so far - nothing else seems to have blown up. I certainly seemed to have oodles of oxygen - although I didn't try turning it up to the biggest possible flame. Not yet, anyway!

The first thing I noticed was that I had to change my working position - raising the chair - so that I could see over the top of the torch - it is a physically larger, taller torch. The candles too, seem so much shorter after the long, rangey candles of the mega - these are short and tight to the torch face.

I did wonder if I was going to be turning the Mega on at all - but went to reduce a bead and realized that I could just turn on the Mega (gas only) to reduce - w/o adjusting the big flame.

To light the top torch when the bottom torch is running, you turn it on and "huff" at the flame - this blows the gas from the top torch down to the bottom, already-lit flame, and ignites the top flame. Also works to light the bottom flame from the top. I don't think I would have figured this out if I hadn't seen it done - but I've watched all the boro workers move back and forth from torch to torch like that. It scores high coolness points.

Hooking it up was simple enough. I had them change the fittings at Nortel to match the smaller, barb fittings that I have on the Mega - so it was just pull the hoses off the Mega and plug them onto the Mid-range.

So now, it's wait until tomorrow to see what comes out of the kiln. Will it be dreck or magic? Or somewhere in between? I can hardly wait!

Wednesday, March 11, 2009

Laucha - Light Red Transparent

Anyone who knows me - knows that if you ask me about transparent red - my choice will be the Lauscha transparent red. A brilliant, red's red - never a trace of liveriness - truly wonderful.

This is a new batch of red - and I'm trying to decide if I think it might actually be a little darker than the old batch.

Hmm - nope - I've just been gazing at it some more, and what I think is making it look a little different is that it is more prone to going cloudy if worked a lot. Much like transparent yellow and orange, and they way they form a "cloud" inside - this has done the same.

The top mandrel is all self-coloured, pure red spacers, and there is a distinct, cloudy core. The second row has a turq (Laucha) wrap (notice - none of that steely discolouration on the Laucha turq - but note - if you use it with ivory - the reaction is so strong it can over power the design). The bottom row are whitehearts.


Even the legs on this are more translucent than transparent.

Still - a stunning colour - a perfect shade of red.

Monday, March 09, 2009

Cool Effect!

How's this for a totally cool effect?

These geological looking beads are made with a base of "Curdled Ivory" and embellished with a thin trail of Double Helix Triton.

Curdled Ivory is a batch of Moretti Dark Ivory that breaks up and makes lots of lovely, dark crackly lines.

Make your core bead of the Curdled Ivory. I find that this is more dramatic with the bigger beads, over inch long. Really heat it a lot - even after laying down the glass, keep it hot and moving for a bit.

Let it stabilize enough to work, and then lay down a trail of Triton. Heat the snot out of it again, shape up, mash if you like.

You should be able to see the ivory separating - see the white dots popping out. (Part of what is happening is that the silver content in the Triton is fuming the ivory. I also tried this with Double Helix Pysche, with passable results - but I like the blue of the Triton better. It's worth trying with other silver-saturated colours too.)


For the final step, I hit it with a "Dragon's Breath" reduction flame to pop out the metallic in the Triton. (Turn off the oxygen, crank up the gas, until the flame stands off the surface of the torch, roll the bead in the flame for a few seconds.)

Pop it in the kiln.

Way cool, eh?

Tuesday, March 03, 2009

Potpourri - or What Happens when you can't read your notes.


OK, I can't decipher the rest of my notes with complete confidence - so I'm just going to throw some images at you, just for fun. (That's why I blog my results - so I can look them up later!) I was experimenting with various TAG and Double Helix glasses at the time - but matching the photos up to the notes, I'm not dead certain about some, so it's just more reliable to re-do some of the tests. But in the meantime, here are some interesting results that I'd like to be able to repeat. Pic 1 - I suspect this is Nyx, encased, but I'm not dead sure.
The blue on this could be Nyx - the caramel is ... ? Luna2? Khaos?


This blue bead - front and back, whatever I did - I seem to have created a "black hole." Over heated in one spot, I presume. It has a kind of cool event horizon vibe going on. Although I was really annoyed by it at the time.


Whatever this is, it's encased. With Kelp, I think.


You'd think a big red bead covered in spots would be easy to find in my notes. Apparently not. The black rings must be a reaction - I'm not that good at dots. Close examination shows some interesting colours in the dots (click on the image for a large version - as will all these images.)


This was one of the TAG glasses - but the label got munged, so I was never sure which one it was. I think it might be 05 Oxblood. Unless it is Black Cherry and I just really made a mess of it.


And I think this was TerraNova. So much potentional - so dark and gloomy.


And, appropo of absolutely nothing at all - my girl Abby. The reason why I consider "b-tch" a complement. ;-)

Talk about the "look of eagles."

Looove that Triton


Love that Triton (Double Helix). For the most drama, reduce it in a Dragon's Breath flame (no oxygen, crank up the gas.) Keep moving the bead in the flame and changing the angle - the strongest and most dramatic reduction seems to happen at 90 degrees to the flame - so the sides of a spacer are nicer than the front area that you see - so tip the bead back and forth in the flame so that all parts hit the flame at a 90 degree angle at some point.

This is a Triton dragon on a ivory bead. The Triton has gone completely metallic. Soooo nice.